AutoSPInstaller is a set of PowerShell scripts and directory structure that helps to automate SharePoint installations. This tutorial assumes that you already have installed Windows Server 2012 R2 and SQL Server SP1 from the post Setup virtual SharePoint 2013 development environment using Oracle Virtualbox. This is however not a necessity as long as you change computer names, references and user accounts to match your own setup.
Some of the benefits of using AutoSPInstaller to install your SharePoint servers are:
- The configuration XML file of AutoSPInstaller works like a checklist which can improve the quality of your installations. (For example properly configured service accounts and other security rights, less “quick-fixes” after installation is complete etc…)
- Automated installation reduce installation and configuration time.
- Since there are less manual work involved you know that when you do the installation the next time it will be exactly as last time (hopefully – would not make any promises here. After all, it is still SharePoint :))
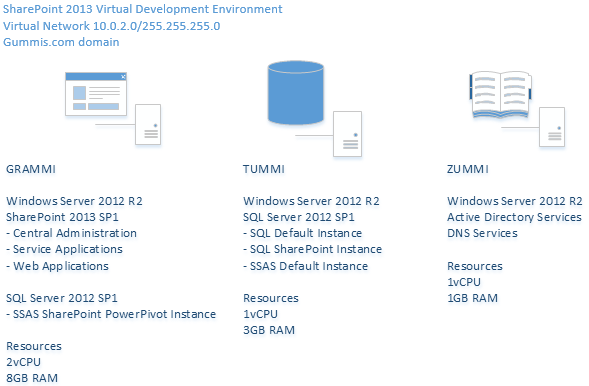
The architecture of the SharePoint 2013 farm:
This post is the second post in the series of posts with the theme SharePoint 2013 BI Development Environment which includes the following topics:
SharePoint 2013 BI Development Environment tutorial
- SharePoint 2013 development environment using Virtualbox
- >Install SharePoint 2013 SP1 using AutoSPInstaller<
- Configure SharePoint 2013 Business Intelligence Services
- SharePoint 2013 Business Intelligence kerberos configuration
Contents
Prerequisites
Below is required software installation medium/ISO files
- Microsoft Windows Server 2012 R2
- Microsoft SharePoint Enterprise Server 2013 SP1 (Note that enterprise is required for Business Intelligence features)
Prepare environment
In Active Directory Computers And Users create the following service accounts:
| Account | Description |
| SP2013_C2WTS | Claims to windows token services |
| SP2013_Crawl | Search crawl |
| SP2013_ExcelServices | Excel Services |
| SP2013_Farm | Farm account |
| SP2013_PowerPivot | Power Pivot Services |
| SP2013_PPS | Performance Point Services |
| SP2013_Profiles | Profile Services Application & sync |
| SP2013_RS | Reporting Services |
| SP2013_Search | Search Services |
| SP2013_Services | Various services |
| SP2013_WebApp | Used for web application pools |
| SP2013_Install | Installation account |
| SP2013_DataAccess | Used for unattended data access for BI services |
Configure Installation account access
- Add account SP2013_Install to local admin on SharePoint server (Grammi).
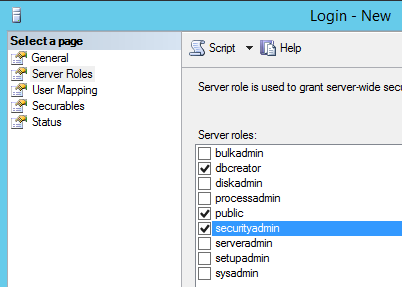
- Create a login to SP2013_Install on SQL Server (Tummi). Assign the login dbcreator, securityadmin roles:
AutoSPInstaller will take care of any other permissons needed.
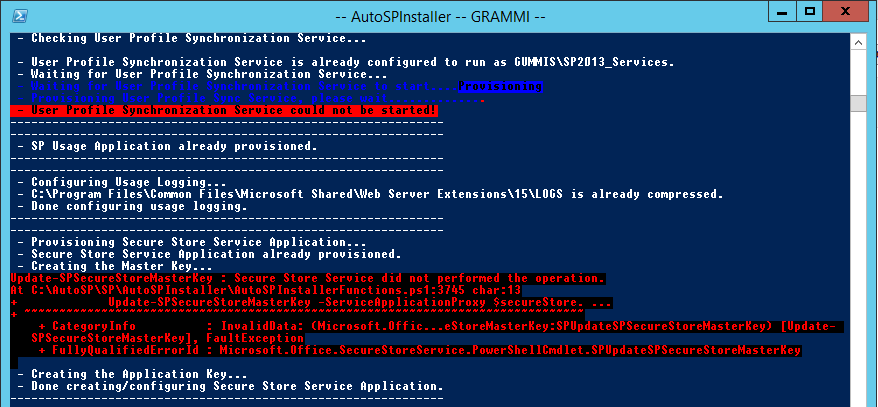
Note: If you are lazy and try to run as the domain administrator account you might get this error(s):
So take the time to create the installation account 🙂
Prepare for user profile synchronization
Login to your domain controller machine. (created as virtual server Zummi in previous post)
- Open Active Directory Users and Computers.
- Right click your domain (gummis.com in this tutorial)
- Select Delegate Control…
- Next -> Add SP2013_Profiles (Created in in previous post) Click next.
- Select create a custom task to delegate. Click next.
- Select This folder, existing objects in this folder and creation of new objects in this folder. Click next.
- Select replicating directory changes:
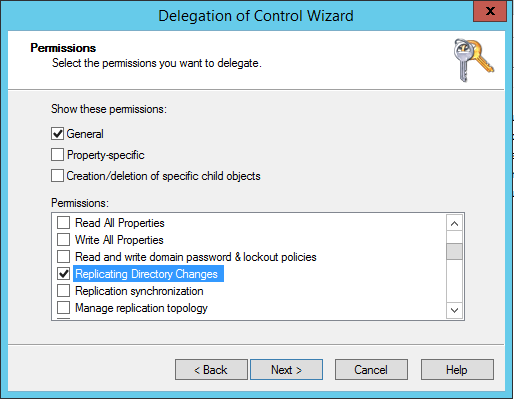
Click next, finish.
Configure DNS
Prepare app domain
Login to your domain controller machine. (created as virtual server Zummi in previous post) Apps in SharePoint 2013 are running in a different domain. Hence we need to setup that domain in the DNS Manager. Right click Forward Lookup Zones. Go through the wizard excpet where to enter your domain name: gummiapps.com (or whatever name you would like to use). 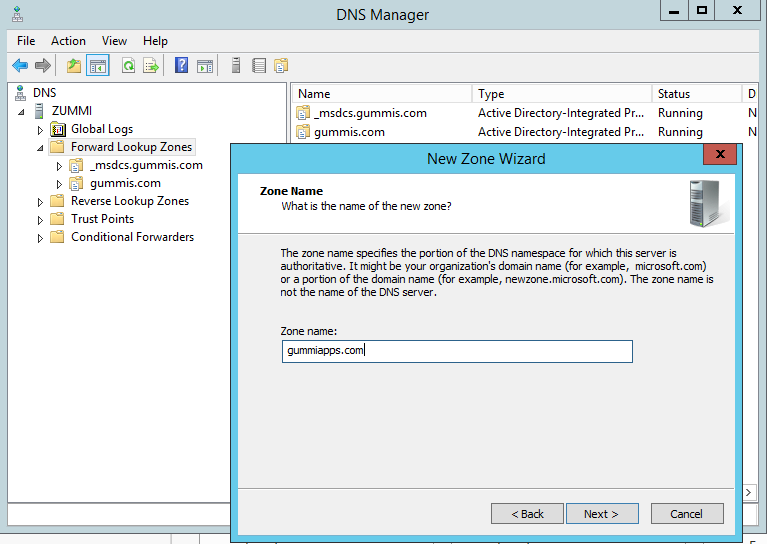
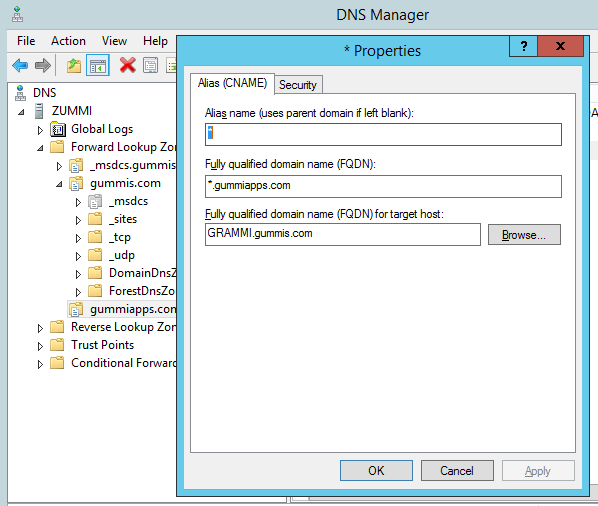
Right click your newly created domain. Select new alias (CNAME). Fill in properties as shown below:
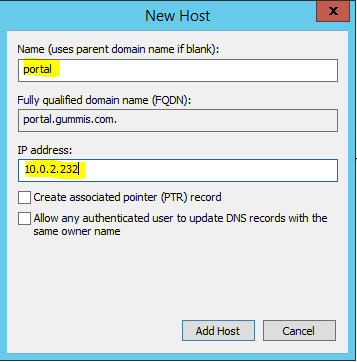
Add web application(s) DNS a records
To properly be able to access your web application with alternate access mappings and to later on configure kerberos add A records for your web applications (portal and mysites – will be configured in AutoSPInstaller later) by right click your domain (gummis.com) –> Add A record:
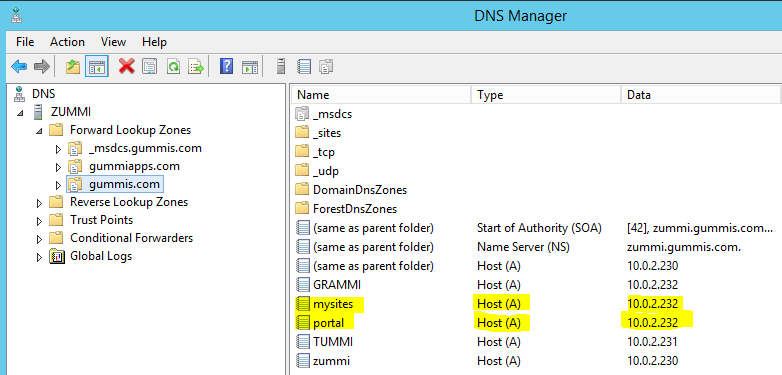
When done the configuration should look as below:
Disable UAC and IE Enhanced protection
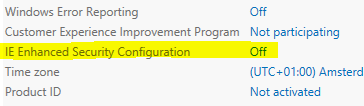
Login to your SharePoint server machine. (created as virtual server Grammi in previous post). In Server Manager –> Local Server disable IE enhanced protection:
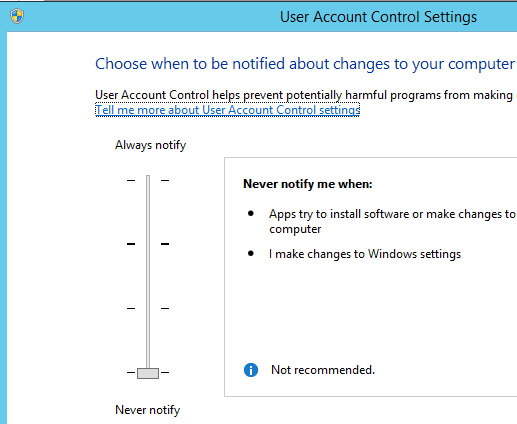
In User Account Control Settings disable UAC:
Download and prepare sources
Login to your SharePoint machine using a domain account. In this tutorial I login as domain administrator. For a production environment it would be recommended to use an installation account. For more information on SharePoint user accounts and requirements see: http://absolute-sharepoint.com/2013/01/sharepoint-2013-service-accounts-best-practices-explained.html or google for more information. Before you can use AutoSPinstaller you nee to prepare it with the base installation of SharePoint 2013 and prerequisites. For offline installation you might also want to complement it with installation files from the Windows installation media. Follow the steps below to do this:
- Create a working directory for AutoSPInstaller and AutoSPSourceBuilder for example: C:\AutoSP.
- Download AutoSPInstaller from http://autospinstaller.codeplex.com/ and extract the zip file into C:\AutoSP\
- Download AutoSPSourceBuilder from https://autospsourcebuilder.codeplex.com/ and extract the zip file into C:\AutoSP\
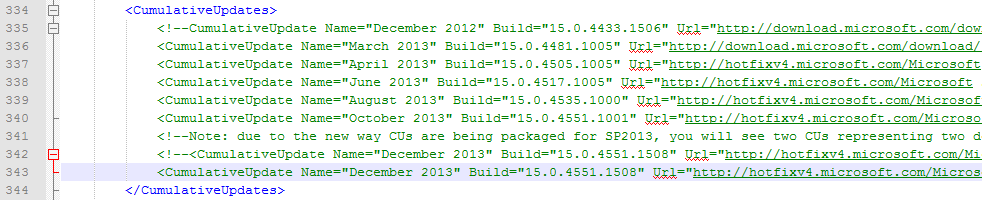
- Since we use Service Pack 1 of SharePoint 2013 we do not want any of the older cumulative updates that exists in AutoSPSourceBuilder (version Apr 28, 2014) comment out the following lines in AutoSPSourceBuilder.xml:
- Open up PowerShell as administrator. If you have not run any PowerShell scripts before you might need to change your execution policy to allow scripts by typing the following command:
Set-ExecutionPolicy unrestricted
Note: For a production environment or if you have any security concerns you might want to change your execution policy back to restricted or other policy. Read more at:http://msdn.microsoft.com/en-us/library/microsoft.powershell.executionpolicy(v=vs.85).aspx
- Mount your SharePoint media. (G: in this case)
- Cd to the AutoSPSourceBuilder directory and run the script:
cd C:\AutoSP\AutoSPSourceBuilder
.\AutoSPSourceBuilder.ps1 -SourceLocation "G:" -Destination "C:\AutoSP\AutoSPInstaller\SP\2013\SharePoint" -GetPrerequisites $true
Note: Since we commented out the cumulative update section before we will get an error message – ignore this, the script will continue.
- Mount your Windows 2012 R2 media. (G: in this case)
- Copy the contents from G:\sources\sxs to C:\AutoSP\AutoSPInstaller\SP\2013\SharePoint\PrerequisiteInstallerFiles\sxs
This will make any additional features that might be needed for offline installation available to the prerequisite installer.
Configure AutoSPInstaller for installation
AutoSPInstaller uses an XML file to install and configure your SharePoint installation. If you have followed the tutorial you will have the file at C:\AutoSP\SP\AutoSPInstaller\AutoSPInstallerInput.xml.
The default AutoSPInstaller.xml is quite well structured with comments. Use a XML texteditor of your choice to edit the file. Or download, review and use the AutoSPInstaller.xml used in this tutorial.
If you like you can also use AutoSPInstallerGUI which is a graphical tool to help you administer the AutoSPInstaller.xml file. Follow the images below for using AutoSPInstallerGUI.
Note: If you get tthe following issue with AutoSPInstallerGUI:
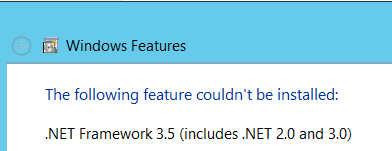
Then run the following command (where source is the sxs directory from Windows 2012 R2 installation media as you prepared earlier):
dism /online /enable-feature /featurename:NetFX3 /all /Source:C:\AutoSP\SP\2013\SharePoint\PrerequisiteInstallerFiles\sxs /LimitAccess
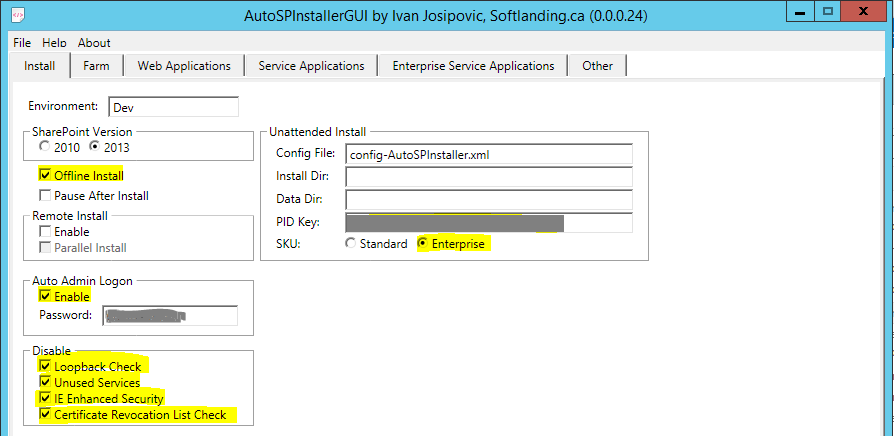
Install tab
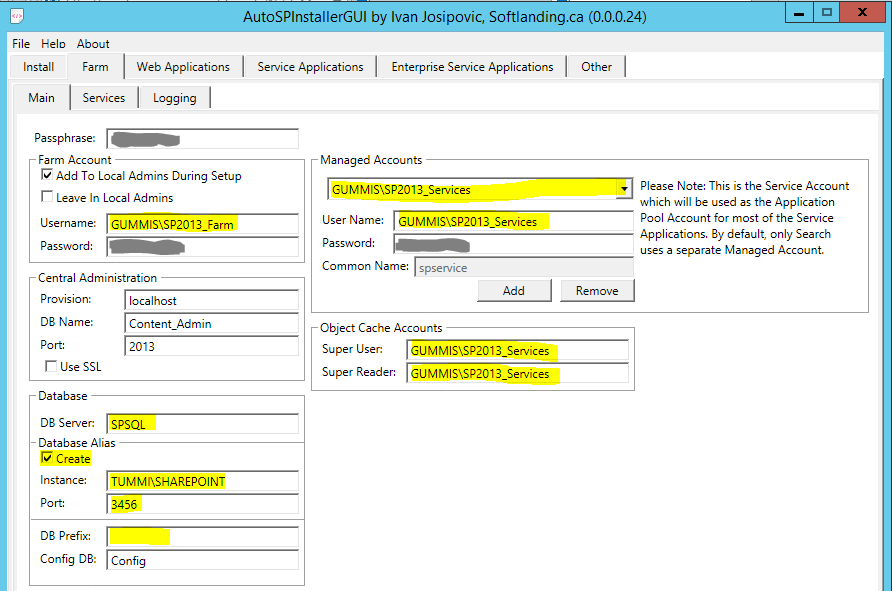
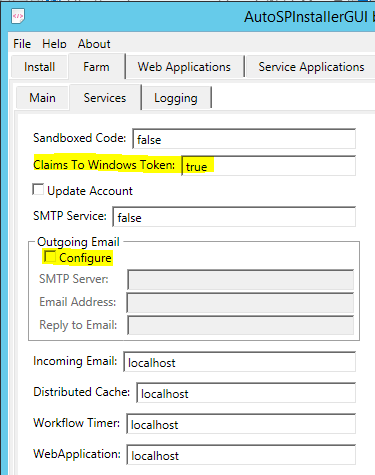
Farm tab
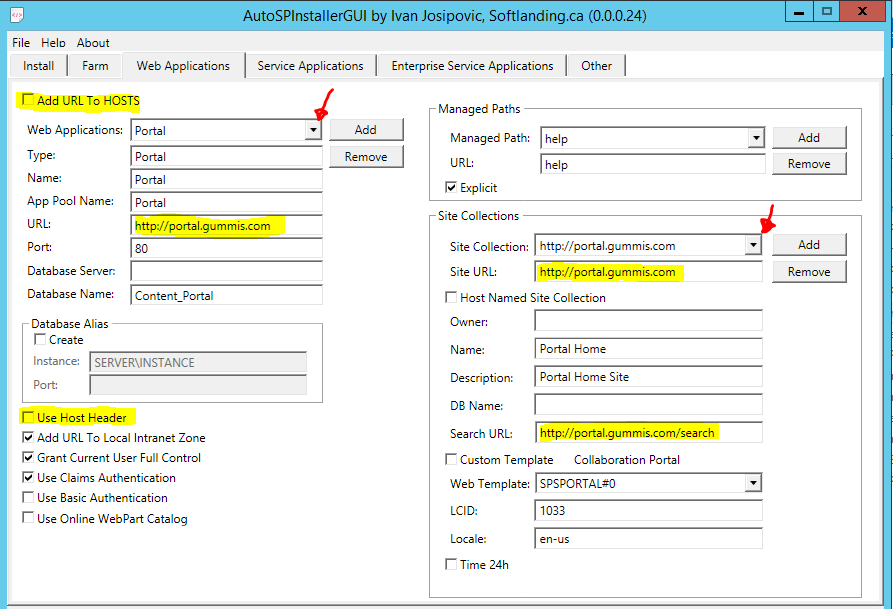
Web applications tab
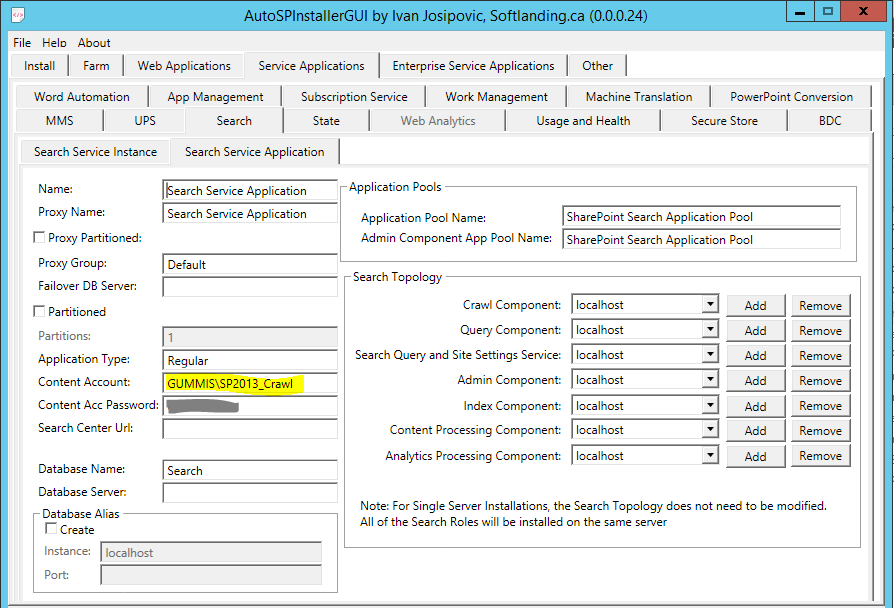
Service Applications tab
The settings not shown above are left as is by default. If you go with AutoSPInstallerGUI do NOT forget to check all the dropdown menus of service accounts, web applications etc. I would recommend that you open the AutoSPInstaller.xml in an texteditor and search for contoso/gummis to ensure that you have configured all url’s and service accounts.
In the virtual machine menubar: File –> Take Snapshot. (If anything goes wrong with the installation it will be easy to revert it to its previous state)
Run C:\AutoSP\SP\AutoSPInstaller\AutoSPInstaller.bat as administrator to start the installation.
The installer will make a few tests with user account verification etc. The installation might restart the computer when installing new features/configurations. This is normal. If there is any error you can go back to your AutoSPInstaller.xml and fix it and then re-run the installation script. It will check which steps that are completed and then continue where it stopped last time.
Tip! If the installation stops at some step and take unusual long time click in the powershell window and press enter. (It seems to wait for a keypress at sometimes).
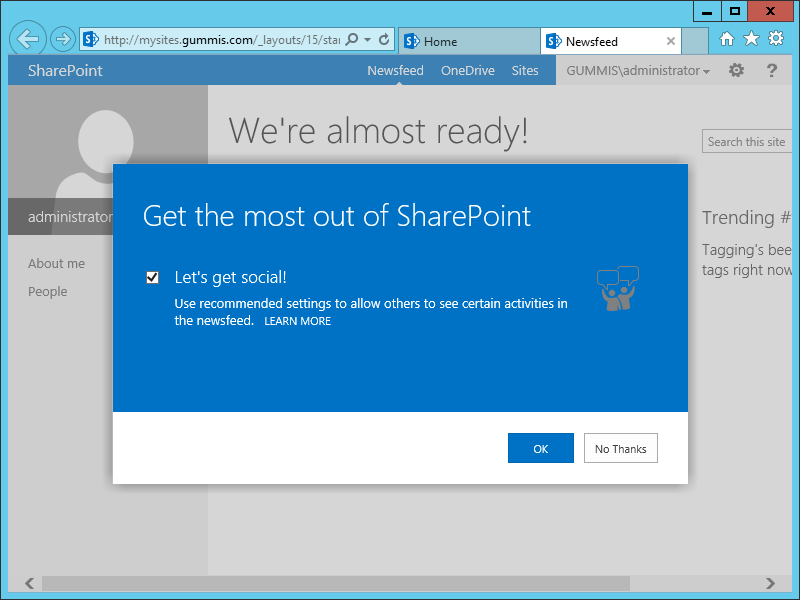
When the script is ready you will hopefully see the mysites and portal site in front of you:
Configure user profile service application
Open Central Administration –> Application Management –> Manage Service Applications
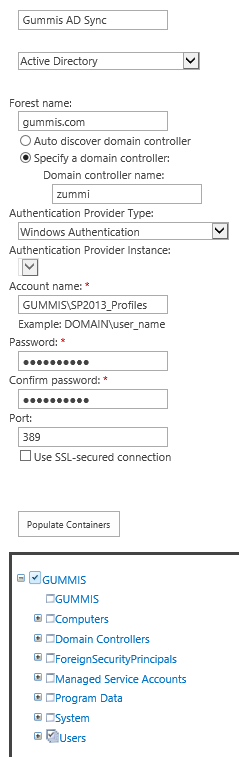
Open User Profile Service Application –> Configure Synchronization Connections –> Create New Connection:
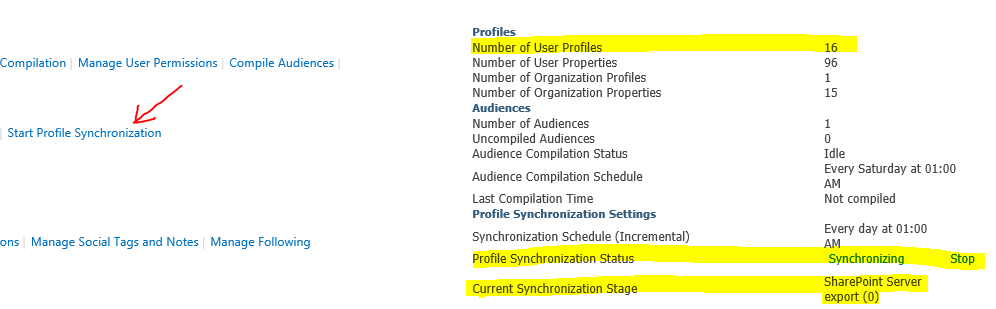
Go back to User Profile Service Application –> Click Start and see that it is working:
If you are low on resources on your development machine you might want to adjust some performance settings such as cache size, search service memory usage, database logging etc. to improve performance. Note that this can cause problems and should not be used in a production environment as is. Below are some PowerShell scripts that you can adjust to fit your needs:
# Set search performance level to reduced
Set-SPEnterpriseSearchService -PerformanceLevel Reduced
# Set noderunner memory limit to 50mb
$nrFile = "C:\Program Files\Microsoft Office Servers\15.0\Search\Runtime\1.0\noderunner.exe.config"
$nrConfig = New-Object XML
$nrConfig.Load($nrFile)
$nrConfig.configuration.nodeRunnerSettings.memoryLimitMegabytes = "50"
$nrConfig.Save($nrFile)
# Set distributed cache to 500 (default is 10% of RAM)
$cacheService ="SPDistributedCacheService Name=AppFabricCachingService"
$cacheServiceInstance = Get-SPcacheServiceInstance | ? {($_.service.tostring()) -eq $cacheService -and ($_.server.name) -eq $env:computername}
$cacheServiceInstance.Unprovision()
Use-CacheCluster
Set-CacheHostConfig -Hostname localhost -cacheport 22233 -cachesize 500 | Out-Null
$cacheServiceInstance.Provision()
# Set SP databases in simple recovery mode (less logging and less recovery possibilities)
$srv = "localhost"
[System.Reflection.Assembly]::LoadWithPartialName("Microsoft.SqlServer.SMO") | out-null
$msmServer = New-Object ('Microsoft.SqlServer.Management.Smo.Server') -argumentlist $srv
$msmServer.Databases | where {$_.IsSystemObject -eq $false} | foreach {$_.RecoveryModel = [Microsoft.SqlServer.Management.Smo.RecoveryModel]::Simple; $_.Alter()}
$msmServer.Configuration.MaxServerMemory.ConfigValue = 1500
$msmServer.Configuration.Alter()