If you like Raspberry Pi’s and like to get into Distributed Computing and Big Data processing what could be a better than creating your own Raspberry Pi Hadoop Cluster?
The tutorial does not assume that you have any previous knowledge of Hadoop. Hadoop is a framework for storage and processing of large amount of data. Or “Big Data” which is a pretty common buzzword those days. The performance of running Hadoop on a Rasperry PI is probably terrible but I hope to be able to make a small and fully functional little cluster to see how it works and perform.
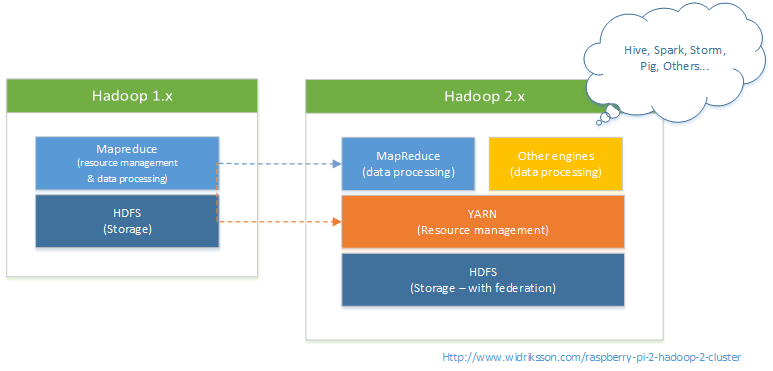
For a tutorial on Hadoop 2 please see my newer post:
http://www.widriksson.com/raspberry-pi-2-hadoop-2-cluster/
In this tutorial we start with using one Raspberry PI at first and then adding two more after we have a working single node. We will also do some simple performance tests to compare the impact of adding more nodes to the cluster. Last we try to improve and optimize Hadoop for Raspberry Pi cluster.
Contents
Fundamentals of Hadoop
What is Hadoop?
“The Apache Hadoop software library is a framework that allows for the distributed processing of large data sets across clusters of computers using simple programming models. It is designed to scale up from single servers to thousands of machines, each offering local computation and storage. Rather than rely on hardware to deliver high-availability, the library itself is designed to detect and handle failures at the application layer, so delivering a highly-available service on top of a cluster of computers, each of which may be prone to failures.”
– http://hadoop.apache.org/
Components of Hadoop
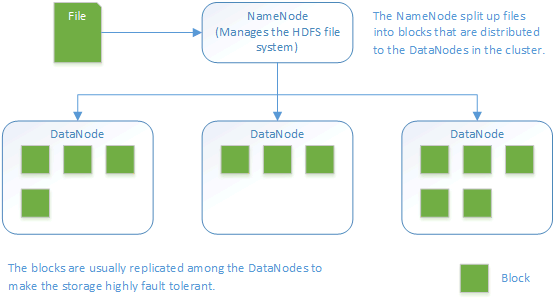
Hadoop is built up by a number of components and Open Source frameworks which makes it quite flexible and modular. However before diving deeper into Hadoop it is easier to view it as two main parts – data storage (HDFS) and data processing (MapReduce):
Daemons/services
| Daemon/service |
Description |
| NameNode |
Runs on a Master node. Manages the HDFS file system on the cluster. |
| Secondary NameNode |
Very misleading name. It is NOT a backup for the NameNode. It make period checks/updates so in case the NameNode fails it can be restarted without the need to restart the data nodes. – http://wiki.apache.org/hadoop/FAQ#What_is_the_purpose_of_the_secondary_name-node.3F |
| JobTracker |
Manages MapReduce jobs and distributes them to the nodes in the cluster. |
| DataNode |
Runs on a slave node. Act as HDFS file storage. |
| TaskTracker |
Runs MapReduce jobs which are received from the JobTracker. |
Master and Slaves
- Master
Is the node in the cluster that has the namenode and jobtracker. In this tutorial we will also configure our master node to act as both master and slave.
- Slave
Node in the cluster that act as a DataNode and TaskTracker.
Note: When a node is running a job the TaskTracker will try to use local data (in its “own” DataNode”) if possible. Hence the benefit of having both the DataNode and TaskTracker on the same node since there will be no overhead network traffic. This also implies that it is important to know how data is distributed and stored in HDFS.
Start/stop scripts
| Script |
Description |
| start-dfs.sh |
Starts NameNode, Secondary NameNode and DataNode(s) |
| stop-dfs.sh |
Stops NameNode, Secondary NameNode and DataNode(s) |
| start-mapred.sh |
Starts JobTracker and TaskTracker(s) |
| stop-mapred.sh |
Stops JobTracker and TaskTracker(s) |
The above scripts should be executed from the NameNode. Through SSH connections daemons will be started on all the nodes in the cluster (all nodes defined in conf/slaves)
Configuration files
| Configuration file |
Description |
| conf/core-site.xml |
General site settings such as location of NameNode and JobTracker |
| conf/hdfs-site.xml |
Settings for HDFS file system |
| conf/mapred-site.xml |
Settings for MapReduce daemons and jobs |
| conf/hadoop-env.sh |
Environment configuration settings. Java, SSH and others |
| conf/master |
Defines master node |
| conf/slaves |
Defines computing nodes in the cluster (slaves). On a slave this file has the default value of localhost |
Web Interface (default ports)
Status and information of Hadoop daemons can be viewed from a web browser through web each dameons web interface:
| Daemon/service |
Port |
| NameNode |
50070 |
| Secondary NameNode |
50090 |
| JobTracker |
50030 |
| DataNode(s) |
50075 |
| TaskTracker(s) |
50060 |
 The setup
- Three Raspberry PI’s model B
(Or you could do with one if you only do first part of tutorial)
- Three 8GB class 10 SD cards
- An old PC Power Supply
- An old 10/100 router used as network switch
- Shoebox from my latest SPD bicycle shoes
- Raspbian Wheezy 2014-09-09
- Hadoop 1.2.1
| Name |
IP |
Hadoop Roles |
| node1 |
192.168.0.110 |
NameNode
Secondary NameNode
JobTracker
DataNode
TaskTracker |
| node2 |
192.168.0.111 |
DataNode
TaskTracker |
| node3 |
192.168.0.112 |
DataNode
TaskTracker |
Ensure to adjust names and IP numbers to fit your enivronment.
Single Node Setup
Install Raspbian
Download Raspbian from:
http://downloads.raspberrypi.org/raspbian_latest
For instructions on how to write the image to an SD card and download SD card flashing program please see:
http://www.raspberrypi.org/documentation/installation/installing-images/README.md
For more detailed instructions on how to setup the Pi see:
http://elinux.org/RPi_Hub
Write 2014-09-09-wheezy-raspbian.img to your SD card. Insert the card to your Pi, connect keyboard, screen and network and power it up.
Go through the setup and ensure the following configuration or adjust it to your choice:
- Expand SD card
- Set password
- Choose console login
- Chose keyboard layout and locales
- Overclocking, High, 900MHz CPU, 250MHz Core, 450MHz SDRAM (If you do any voltmodding ensure you have a good power supply for the PI)
- Under advanced options:
- Hostname: node1
- Memory split: 16mb
- Enable SSH Server
Restart the PI.
Configure Network
Install a text editor of your choice and edit as root or with sudo:
/etc/network/interfaces
iface eth0 inet static
address 192.168.0.110
netmask 255.255.255.0
gateway: 192.168.0.1
Edit /etc/resolv.conf and ensure your namesservers (DNS) are configured properly.
Restart the PI.
Configure Java Environment
With the image 2014-09-09-wheezy-raspbian.img Java comes pre-installed. Verify by typing:
java -version
java version "1.8.0"
Java(TM) SE Runtime Environment (build 1.8.0-b132)
Java HotSpot(TM) Client VM (build 25.0-b70, mixed mode)
Prepare Hadoop User Account and Group
sudo addgroup hadoop
sudo adduser --ingroup hadoop hduser
sudo adduser hduser sudo
Configure SSH
Create SSH RSA pair keys with blank password in order for hadoop nodes to be able to talk with each other without prompting for password.
su hduser
mkdir ~/.ssh
ssh-keygen -t rsa -P ""
cat ~/.ssh/id_rsa.pub > ~/.ssh/authorized_keys
Verify that hduser can login to SSH
su hduser
ssh localhost
Go back to previous shell (pi/root).
Install Hadoop
Download and install
cd ~/
wget http://apache.mirrors.spacedump.net/hadoop/core/hadoop-1.2.1/hadoop-1.2.1.tar.gz
sudo mkdir /opt
sudo tar -xvzf hadoop-1.2.1.tar.gz -C /opt/
cd /opt
sudo mv hadoop-1.2.1 hadoop
sudo chown -R hduser:hadoop hadoop
Configure Environment Variables
This configuration assumes that you are using the pre-installed version of Java in 2014-09-09-wheezy-raspbian.img.
Add hadoop to environment variables by adding the following lines to the end of /etc/bash.bashrc:
export JAVA_HOME=$(readlink -f /usr/bin/java | sed "s:bin/java::")
export HADOOP_INSTALL=/opt/hadoop
export PATH=$PATH:$HADOOP_INSTALL/bin
Alternative you can add the configuration above to ~/.bashrc in the home directory of hduser.
Exit and reopen hduser shell to verify hadoop executable is accessible outside /opt/hadoop/bin folder:
exit
su hduser
hadoop version
hduser@node1 /home/hduser $ hadoop version
Hadoop 1.2.1
Subversion https://svn.apache.org/repos/asf/hadoop/common/branches/branch-1.2 -r 1503152
Compiled by mattf on Mon Jul 22 15:23:09 PDT 2013
From source with checksum 6923c86528809c4e7e6f493b6b413a9a
This command was run using /opt/hadoop/hadoop-core-1.2.1.jar
Configure Hadoop environment variables
As root/sudo edit /opt/hadoop/conf/hadoop-env.sh, uncomment and change the following lines:
# The java implementation to use. Required.
export JAVA_HOME=$(readlink -f /usr/bin/java | sed "s:bin/java::")
# The maximum amount of heap to use, in MB. Default is 1000.
export HADOOP_HEAPSIZE=250
# Command specific options appended to HADOOP_OPTS when specified
export HADOOP_DATANODE_OPTS="-Dcom.sun.management.jmxremote $HADOOP_DATANODE_OPTSi -client"
Note 1: If you forget to add the -client option to HADOOP_DATANODE_OPTS you will get the following error messge in hadoop-hduser-datanode-node1.out:
Error occurred during initialization of VM
Server VM is only supported on ARMv7+ VFP
Note 2: If you run SSH on a different port than 22 then you need to change the following parameter:
# Extra ssh options. Empty by default.
# export HADOOP_SSH_OPTS="-o ConnectTimeout=1 -o SendEnv=HADOOP_CONF_DIR"
export HADOOP_SSH_OPTS="-p <YOUR_PORT>"
Or you will get the error:
connect to host localhost port 22: Address family not supported by protocol
Configure Hadoop
In /opt/hadoop/conf edit the following configuration files:
core-site.xml
<configuration>
<property>
<name>hadoop.tmp.dir</name>
<value>/hdfs/tmp</value>
</property>
<property>
<name>fs.default.name</name>
<value>hdfs://localhost:54310</value>
</property>
</configuration>
mapred-site.xml
<configuration>
<property>
<name>mapred.job.tracker</name>
<value>localhost:54311</value>
</property>
</configuration>
hdfs-site.xml
<configuration>
<property>
<name>dfs.replication</name>
<value>1</value>
</property>
</configuration>
Create HDFS file system
sudo mkdir -p /hdfs/tmp
sudo chown hduser:hadoop /hdfs/tmp
sudo chmod 750 /hdfs/tmp
hadoop namenode -format
Start services
Login as hduser. Run:
/opt/hadoop/bin/start-dfs.sh
/opt/hadoop/bin/start-mapred.sh
Run the jps command to checkl that all services started as supposed to:
jps
16640 JobTracker
16832 Jps
16307 NameNode
16550 SecondaryNameNode
16761 TaskTracker
16426 DataNode
If you cannot see all of the processes above review the log files in /opt/hadoop/logs to find the source of the problem.
Run sample test
Upload sample files to HDFS (Feel free to grab any other textfile you like than license.txt):
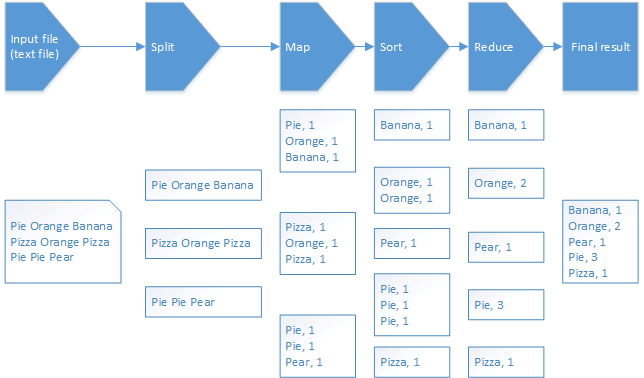
hadoop dfs -copyFromLocal /opt/hadoop/LICENSE.txt /license.txt
Run wordcount example:
hadoop jar /opt/hadoop/hadoop-examples-1.2.1.jar wordcount /license.txt /license-out.txt
When completed you will see some statistics about the job. If you like to see the outputfile grab the file form HDFS to local file system:
hadoop dfs -copyToLocal /license-out.txt ~/
Open the ~/license-out.txt/part-r-00000 file in any text editor to see the result. (You should have all words in the license.txt file and their number of occurrences)
Single node performance test
For performance test I have put together a few sample files by concatenating textbooks from project gutenberg and run them in the same manner as the sample test above.
Result:
| File |
Size |
Wordcount execution time (mm:ss) |
| smallfile.txt |
2MB |
2:17 |
| mediumfile.txt |
35MB |
9:19 |
Download sample text files for performance test.
I also tried to some larger files but then the PI ran out of memory.
Hadoop Raspberry Pi Cluster Setup
Prepare Node1 for cloning
Since we will make a clone of node1 later the settings made here will be the “base” for all new nodes.
Edit configuration files
/etc/hosts
192.168.0.110 node1
192.168.0.111 node2
192.168.0.112 node3
In a more serious setup you should use real DNS to setup name lookup, however to make it easy we will just go with the hosts file.
/opt/hadoop/conf/masters
node1
Note: conf/masters file actually tells which node that is the Secondary NameNode. Node1 will become NameNode when we start the NameNode service on that machine.
In /opt/hadoop/conf edit the following configuration files and change from localhost to node1:
core-site.xml
<configuration>
<property>
<name>hadoop.tmp.dir</name>
<value>/hdfs/tmp</value>
</property>
<property>
<name>fs.default.name</name>
<value>hdfs://node1:54310</value>
</property>
</configuration>
mapred-site.xml
<configuration>
<property>
<name>mapred.job.tracker</name>
<value>node1:54311</value>
</property>
</configuration>
Wipe HDFS
Note: In the next step we will completely wipte out the current hdfs storage – all files and data that you have used in hdfs will be lost. When you format the namenode there is also an issue causing the error message: Incompatible namespaceIDs in path/to/hdfs. This can happen when starting/doing file operations on the datanode after the namenode has been formatted. This issue is explained more in detail here.
rm -rf /hdfs/tmp/*
Later on we will format the namenode but we do this to ensure the hdfs filesystem is clean on all the nodes.
Clone Node1 and setup slaves
Clone the SD Card of node1 to the other SD cards you plan to use for the other nodes. There are various programs that can do this i used Win32DiskImager.
For each cloned node make sure to:
- Change hostame in /etc/hostname
- Change IP Adress in /etc/network/interfaces
- Restart the Pi.
Configure Node1
/opt/hadoop/conf/slaves
node1
node2
node3
Note: The masters and slaves configuration files are only read by the hadoop start/stop scripts such as: start-all.sh, start-dfs.sh and start-mapred.sh.
On node1, ensure you can reach node2 and node3 from ssh as hduser without need to enter password. If this does not work: copy /home/hduser/.ssh/id_rsa.pub on node1 to /home/hduser/.ssh/authorized_keys on the node that you try to connect to.
su hduser
ssh node1
exit
ssh node2
exit
ssh node3
exit
Enter Yes when you get the “Host key verification failed message”.
Format hdfs and start services
On node1:
hadoop namenode -format
/opt/hadoop/bin/start-dfs.sh
/opt/hadoop/bin/start-mapred.sh
Verify that daemons are running correctly
On node1:
jps
3729 SecondaryNameNode
4003 Jps
3607 DataNode
3943 TaskTracker
3819 JobTracker
3487 NameNode
On the other nodes:
jps
2307 TaskTracker
2227 DataNode
2363 Jps
Note: If you have issues you can examine the logfiles /opt/hadoop/logs or you can try to start each service manually on the node that is failing for example:
On node1:
hadoop namenode
hadoop datanode
You may now also try to access hadoop from the web interface to see which nodes that are active and other statistics:
http://node1:50030
http://node1:50070
Hadoop Raspberry Pi performance tests and optimization
For those tests I used the same sample text files as for the single node setup.
Download sample files
Those tests are to highlight some of the issues that can occur when you run hadoop the first time and especially in a Raspberry Pi cluster since it is very limited. The tests will do some things “very wrong” in order to point out the issues that can occur. If you just want to optimize for the Raspberry Pi you can check out the changes that are made in the last test. Also please notice that those test are done for the mediuim.txt sample file provided above and is no “general-purpose” optimizations. If you have used Hadoop before those test are probably of no use for you since you already have figured out what to do 🙂
First run
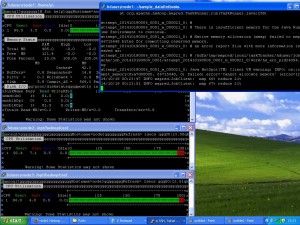
Start two three SSH terminal windows – one for each node. Then start a monitoring program in each of them. I used nmon but you could as well go with top or any other monitor of your choice. Now you will be able to watch the load put on your Pi’s by the WordCount MapReduce program.
Go back to your main terminal window (for node1) and upload files to HDFS and run the WordCount program:
hadoop dfs -copyFromLocal mediumfile.txt /mediumfile2.txt
hadoop jar /opt/hadoop/hadoop-examples-1.2.1.jar wordcount /mediumfile2.txt /mediumfile2-out.txt
Then watch the monitors of your nodes. Not much going on on node2 and node3? But node1 is running all of the job? The JobTracker is not distributing the jobs out to our other nodes. This is because as default HDFS is configured for use of really large files and the block-size is set to 64mb. Our file is only 35MB (medium.txt) hence it will only be split into one block and hence only one node can work on it.
Second run
Optimize block size
In order to tackle the block-size problem above edit the conf/hdfs-site.xml on all your nodes and to the following:
hdfs-site.xml
<configuration>
 <property>
 <name>dfs.replication</name>
 <value>1</value>
 </property>
 <property>
 <name>dfs.block.size</name>
 <value>1048576</value>
 </property>
</configuration>
The above configuration will set block size to 1mb. Lets make another run and see what happens:
hadoop jar /opt/hadoop/hadoop-examples-1.2.1.jar wordcount /mediumfile2.txt /mediumfile3-out.txt
| File |
Size |
WordCount execution time (mm:ss) |
| mediumfile.txt |
35MB |
14:24 |
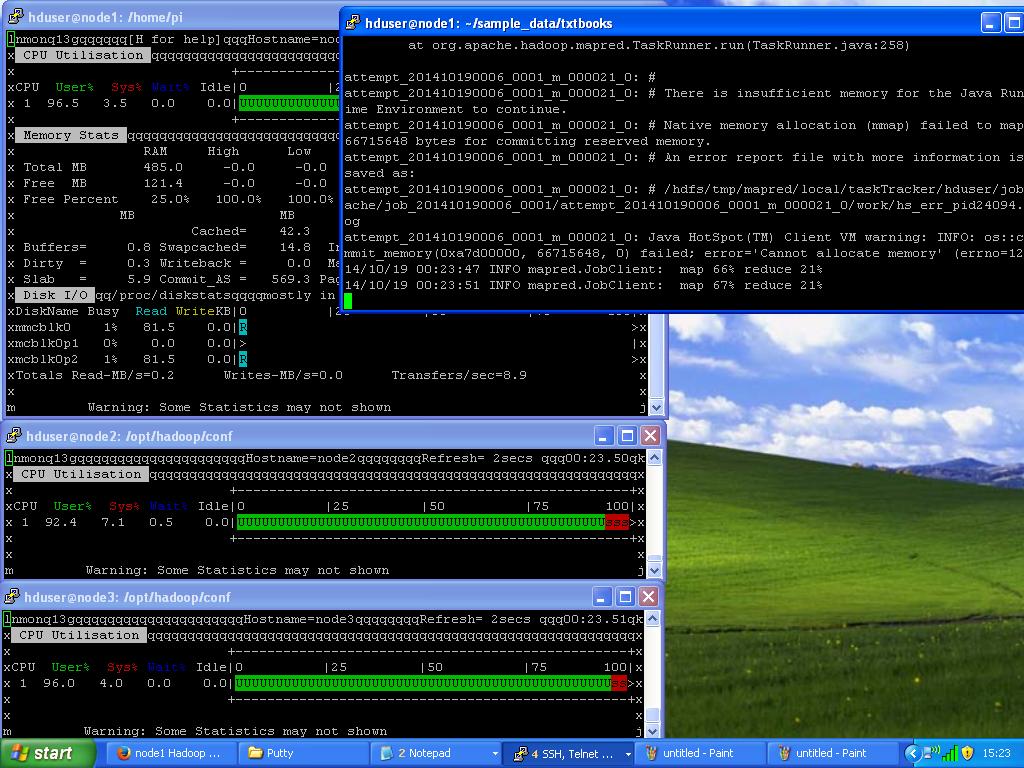
 Still not very impressive, right? It’s even worse than the single node setup… This is due to that when you upload a file to HDFS and you do it locally e.g. from a datanode (which we are doing since node1 is a datanode) it will copy the data local. Hence all our blocks are now on node1. Hadoop also tries to run jobs as close as possible to where the data i stored to avoid network overhead. However some of the blocks might get copied over the node2 and node3 for processing but node1 is moste likely to get the most load. Also node1 is running as NameNode and JobTracker and has additional work to do. Also I noticed in several of the jobs the job failed with out of memory exception as seen in picture to the right. Then 1mb of block-size is might be to small even on the Pi’s depending on our file size. But now will have our file split into 31 blocks where each block will cause a bit of overhead. (The less blocks we need the better – if we still can evenly spread the blocks across our nodes).
Third run
Optimize block size
Lets make another try. This time we change the block-size to 10mb: (conf/hdfs-site.xml)
hdfs-site.xml
<property>
 <name>dfs.block.size</name>
 <value>1048576</value>
 </property>
Format NameNode
Node1 got a bit overloaded in the previous scenario we will now remove its role as TaskTracker and DataNode. Before we can remove node1 as DataNode format the namenode (as we otherwise would end up with dataloss since we have the dfs.replication set to 1 our data is not redundant)
On all nodes:
rm -rf /hdfs/tmp/*
On node1:
hadoop namenode -format
Configure Node1 to only be master
Edit conf/slaves and remove node1. Then stop and start the cluster again:
stop-mapred.sh
stop-dfs.sh
start-dfs.sh
start-mapred.sh
Then upload our sample data and start the job again:
hadoop dfs -copyFromLocal mediumfile.txt /mediumfile.txt
hadoop jar /opt/hadoop/hadoop-examples-1.2.1.jar wordcount /mediumfile.txt /mediumfile-out.txt
| File |
Size |
WordCount execution time (mm:ss) |
| mediumfile.txt |
35MB |
6:26 |
So now we actually got a bit of improvement compared to a single node setup. This is due to that when you upload a file to HDFS from a client e.g. not locally on the DataNode Hadoop will try to spread the blocks evenly among the nodes and not as in our previous test. However this is still not optimal since now we are not using node1 to its full processing potential. What we would like to do is to have all nodes as DataNodes and TaskTrackers with the file blocks spread nice and evenly on all of them.
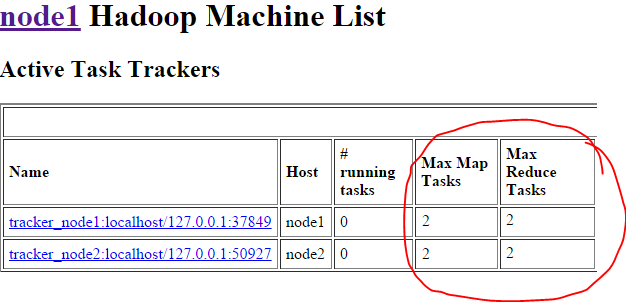
Also if you go to http://node1:50030 and click on number 3 under “nodes” in the table you will see that our nodes are setup to be able to handle 2 map tasks (See picture below). However the Raspberry Pi is a one (and one pretty slow) processor core. It will most likely not perform well of running multiple tasks. So lets set things correct in the last run.
Fourth run
Re-format NameNode (again)
On all nodes:
rm -rf /hdfs/tmp/*
On node1:
hadoop namenode -format
Optimize block size
Lets make the block-size a bit smaller than before. Lower it to 5mb.
<configuration>
 <property>
 <name>dfs.replication</name>
 <value>1</value>
 </property>
 <property>
 <name>dfs.block.size</name>
 <value>5242880</value>
 </property>
</configuration>
Configure TaskTrackers max tasks
As mentioned in the last text of previous test. If you go to http://node1:50030 and look on your nodes you will se that max map and reducer tasks are set to 2. This is to much for the Raspberry Pi’s. We will change max map and reducer tasks to the amount of CPU cores each device has: 1.
On all your nodes:
mapred-site.xml
 <configuration>
 <property>
 <name>mapred.job.tracker</name>
 <value>node1:54311</value>
 </property>
<property>
<name>mapred.tasktracker.map.tasks.maximum</name>
<value>1</value>
</property>
<property>
<name>mapred.tasktracker.reduce.tasks.maximum</name>
<value>1</value>
</property>
</configuration>
Configure Node1 back to act as both slave and master
Edit conf/slaves and add node1. Then stop and start the cluster again:
stop-mapred.sh
stop-dfs.sh
start-dfs.sh
start-mapred.sh
Verify Max Map Tasks and Max Reduce Tasks
Go to http://node1:50030, click your nodes in the cluster summary table and ensure max map and max reduce tasks are set to 1:

Upload Sample file (again)
hadoop dfs -copyFromLocal mediumfile.txt /mediumfile.txt
Balance HDFS file system
Of course it is possible to upload data on one node and the distribute it evenly across all nodes. Run the following to see how our mediumfile.txt currently is stored:
hadoop fsck /mediumfile.txt -files -blocks -racks
As you most likely will see all the blocks are stored on node1. In order to spread the blocks evenly on all nodes run the following:
hadoop balancer -threshold 0.1
The threshold parameter is a float value from 0 to 100 (percentage). The lower the more balanced your blocks will be. Since we only have one file and that file is a very small percentage of our total storage we need to set it really small to put the balancer into work. After the balancing is complete very the file blocks again by:
hadoop fsck /mediumfile.txt -files -blocks -racks
Last run
hadoop jar /opt/hadoop/hadoop-examples-1.2.1.jar wordcount /mediumfile.txt /mediumfile-out.txt
| File |
Size |
WordCount execution time (mm:ss) |
| mediumfile.txt |
35MB |
5:26 |
Finally we got a bit better performance! There are probably lots of other things we could fine tune more but for this tutorial we are happy with this. If you want to go further there are plenty of stuff to find on google and elsewhere. Hope you enjoyed! Now go code some cool MapReduce jobs and put your cluster to work! 🙂
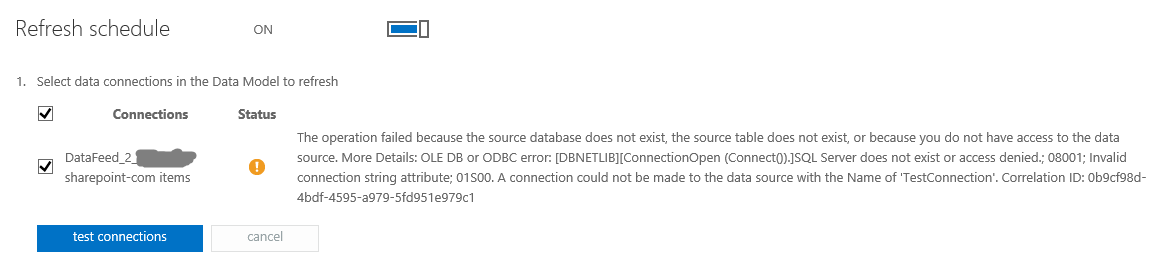
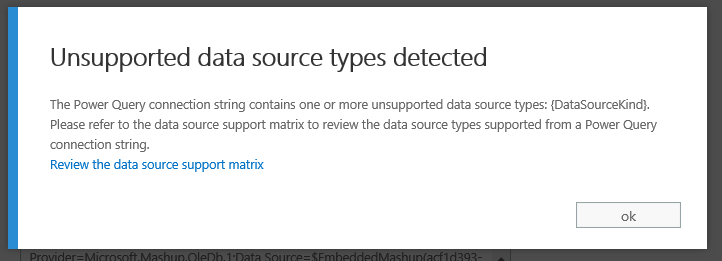
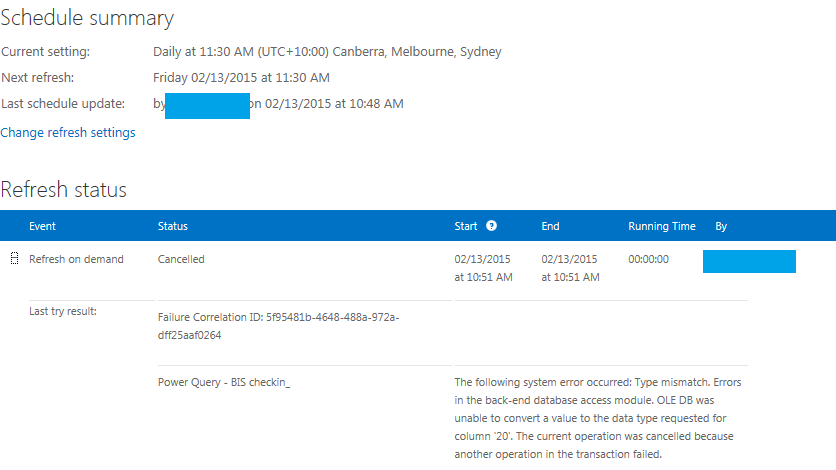
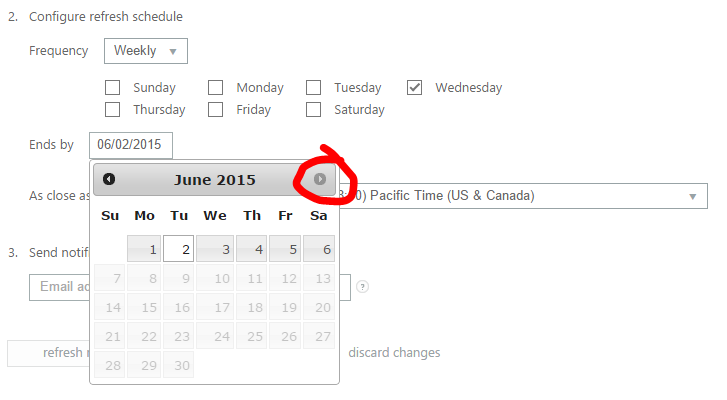
 With the latest Power BI releases in mid-2016 Microsoft finally plugs the gap between on-premise Business Intelligence solutions and the cloud. On-premise enterprise BI solutions can now be re-used seamlessly with low level of development and infrastructure changes. If you would have asked Microsoft, they would probably have told you that Power BI was enterprise ready years ago. Even though the product might have been visually appealing and worked well for self-service, small businesses to SME’s the product lacked important features for enterprise BI. Scalability and stability have also been an issue. Until now. Last year Microsoft have made quite a commitment to Power BI and some important features have been added which makes Power BI more mature and maybe a game changer for enterprises to start moving Business Intelligence into the cloud. Among some of the exciting features that have been released last year are:


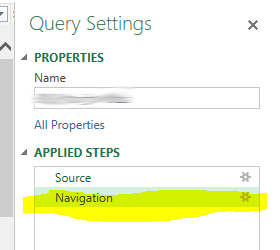


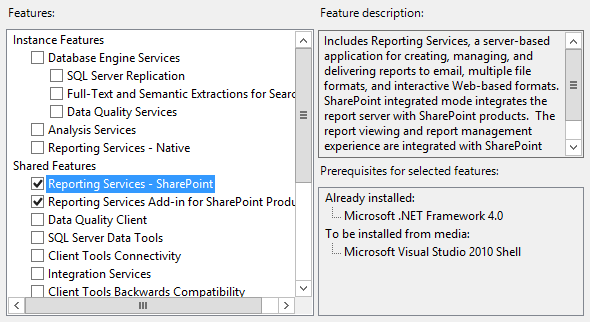
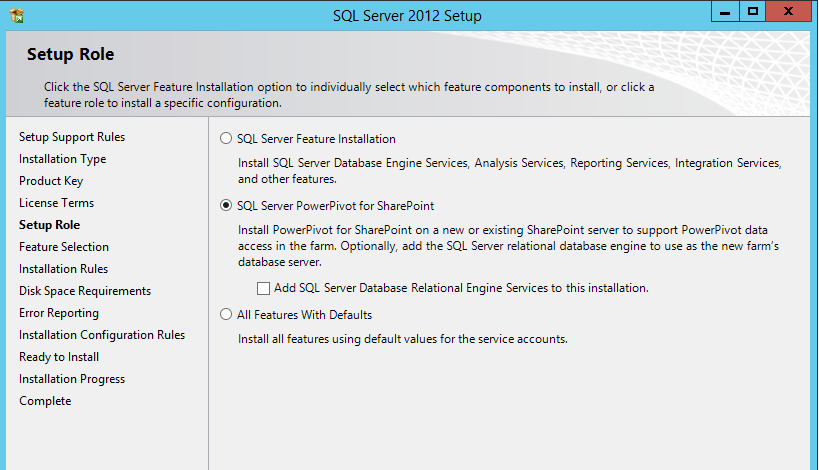


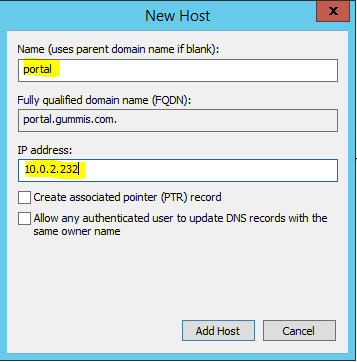
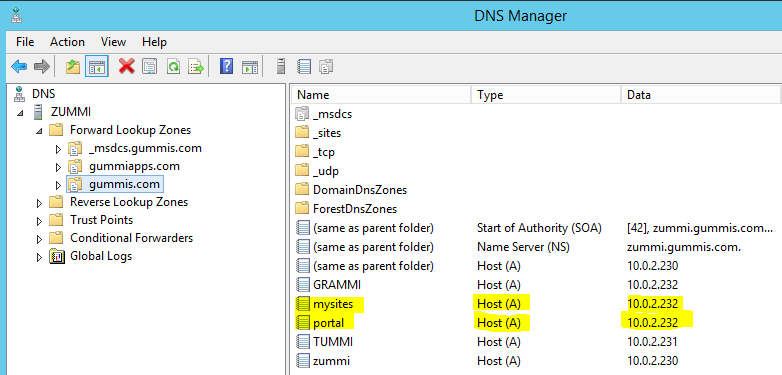


 Do not forget to add yourself/domain admin account as administrator account:
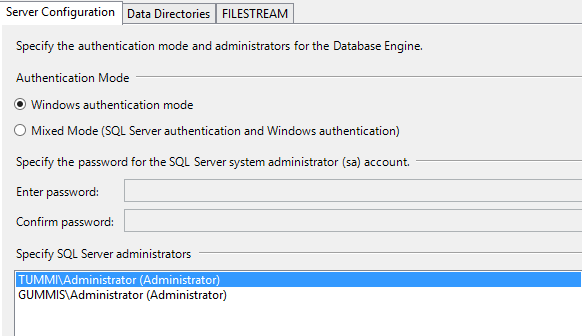
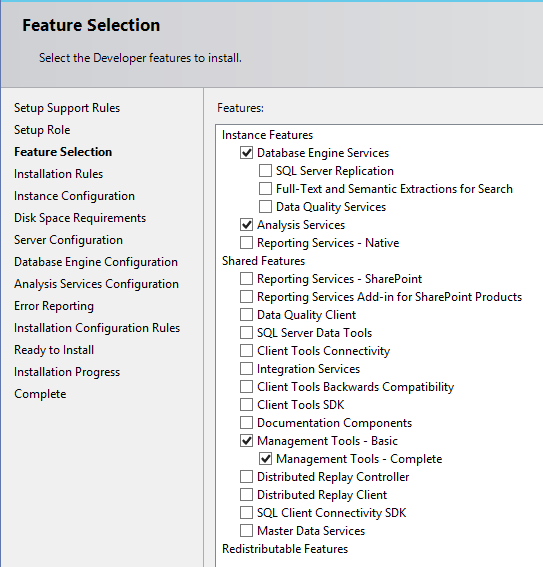
 Change name of instance:
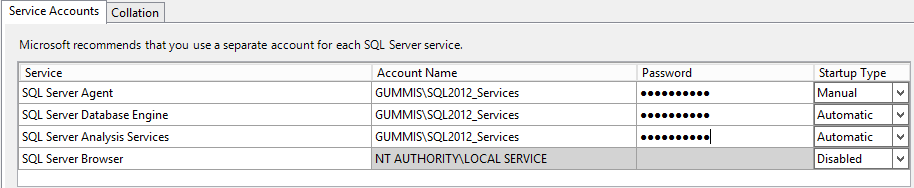
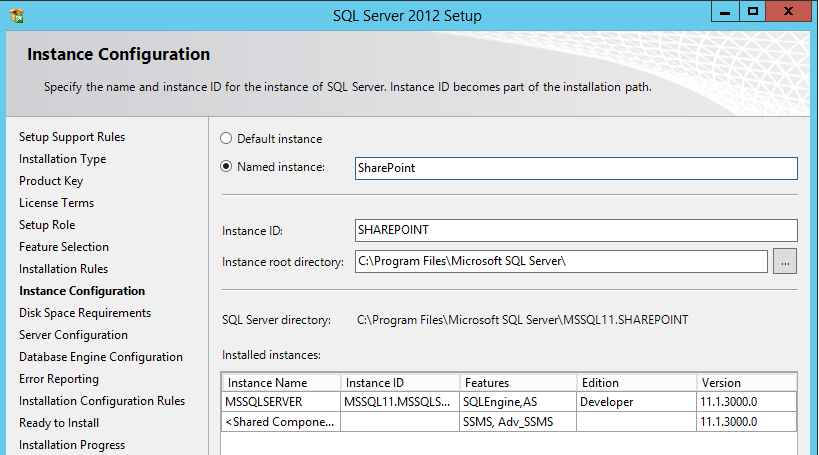 Configure service accounts:
 Do not forget to add yourself/domain admin account as administrator account: