This post describe My Sites migration issues that can occur when migrating from SharePoint 2010 to SharePoint 2013 in a new environment with a new active directory domain setup. In a better world you would normally be in same AD and domain. The process to upgrade within the same domain is a standard approach and is described in general here:
https://technet.microsoft.com/en-us/library/cc262483.aspx
and for My Sites:
https://technet.microsoft.com/en-us/library/dn479424.aspx
Content
Scenario
- Migration from SharePoint 2010 to SharePoint 2013 in new windows domain with new Active Directory
- Existing MySite content database from SharePoint 2010 is quite messy with orphaned/duplicate sites for some users. (For example user Greger may be owner of two MySites but his user profile is only linked to one of them)
- Many users in the new Active Directory have the same account name however not all of them. For all users we have a file with account name mappings between old and new accounts.
- Since we have a new Active Directory with new accounts we will not migrate User Profile Service Application Service database(s)
- Users have been using their MySites to mainly to store documents. Social features will not be taken into account in this post.
Migration steps
This assumes that you have already setup and configured your SharePoint 2013 farm, services and web applications. The following will deal with MySites and User Profile Service Application only.
- Disable MySite Clean Up Job:
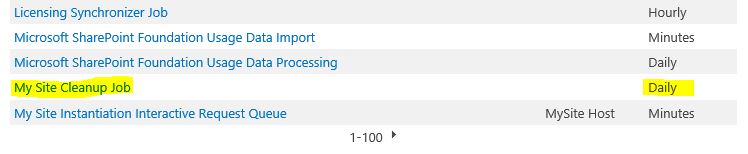
Disable-SPTimerJob -Identity "mysitecleanup"
- Backup and restore MySite content database(s) from old database server to new
- Provision/create User Profile Service Application following the instructions on:
https://technet.microsoft.com/sv-se/library/ee721052.aspx - Setup Synchronization Connections:
https://technet.microsoft.com/sv-se/library/ee721049.aspx#Phase2 - Start user profile synchronization (and verify that it is working correctly)
- Install any customization’s/solutions
- If needed plan and take into consideration on how to migrate from classic to claims based auth:
https://technet.microsoft.com/en-us/library/gg251985.aspx - Run Test-SPContentDatabase
- Create a MySite host location (Use content database from step 2, or create with new blank content database and do Dismount-SPContentDatabase – Mount-SPContentDatabase)
https://technet.microsoft.com/en-us/library/ee624362.aspx - Migrate user references from old domain to new domain using a CSV file complete with all group and user domain mappings
(See PowerShell script further down) - If needed upgrade to SharePoint 2013 experience (or run in compatibility mode):
$w = Get-SPWebApplication http://mysites.dev.local
$w.CompatibilityRange.MinCompatibilityLevel = 15
$w.Update
Upgrade My Site host
Upgrade-SPSite http://mysites.dev.local -versionupgrade
Force upgrade of personal sites:
Get-SPSite -limit all |where {$_.CompatibilityLevel -eq '14'} | where {$_.RootWeb.WebTemplateId -eq 21} | upgrade-spsite -versionupgrade - Read through the issues section below and:
*Ensure My sites have correct owner from new domain
*Ensure user profiles link to correct personal site
*Run/modify PowerShell scripts to achieve the above - Go to Central Admin -> Manage Service Applications -> User Profile Service -> Setup My Sites (Configure to fit your approach)
- Start My Site Cleanup Job
Enable-SPTimerJob -Identity "mysitecleanup"
- Verify that your My Sites not are deleted by the cleanup job.
My Sites migration issues when moving to new domain
User Profile not linked to personal site
Most of the issues occurring are most likely to be related to that the user profiles in your newly provisioned User Profile Service Application Service does not have any properties set for which My Site capabilities they have or which personal site they are linked to. If this is not solved you might get further problem when users start trying to access their personal sites. Since then SharePoint does not think your users have any personal sites it will by default create new empty ones. This can also depend upon how you have configured your site naming format:
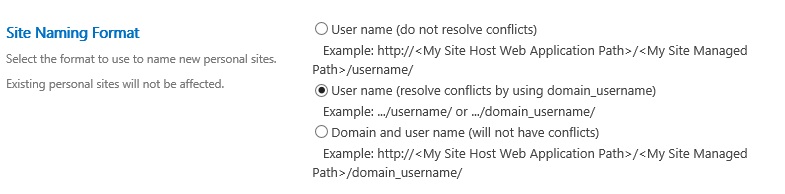
In case there are no conflict resolution users might have an error since their personal site already exist. However if conflict resolution is enabled your users will end up with a new blank personal site instead of their previously converted site. If this happens you may try to fix the issue by re-linking affected users to their correct personal site and then delete the new empty personal site. However when you remove the newly created empty site of a user their user profile will be marked as deleted! Hence delete the new blank site first and then re-link user profile to the correct migrated personal site if this occurs.
View User Profile properties and re-link to personal site using PowerShell:
$w = Get-SPWebApplication http://mysites.dev.local/
$context = Get-SPServiceContext $w.Sites[0]
$profileManager = new-object Microsoft.Office.Server.UserProfiles.UserProfileManager($context)
$uProfile = $profileManager.GetUserProfile("administrator")

# Update user profile properties (change and uncomment below lines)
# $uProfile["PersonalSpace"].Value = "/personal/administrator/"
# $uProfile.Commit()
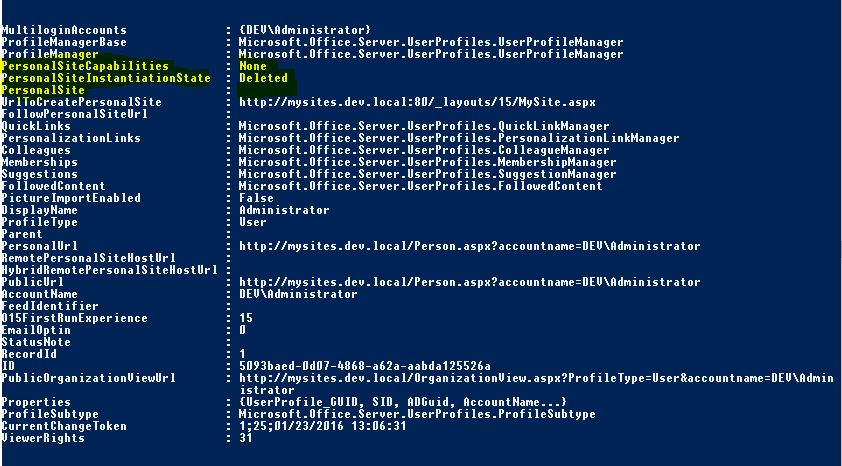
This can be very useful in trial and error of why some profiles work or not. Example:
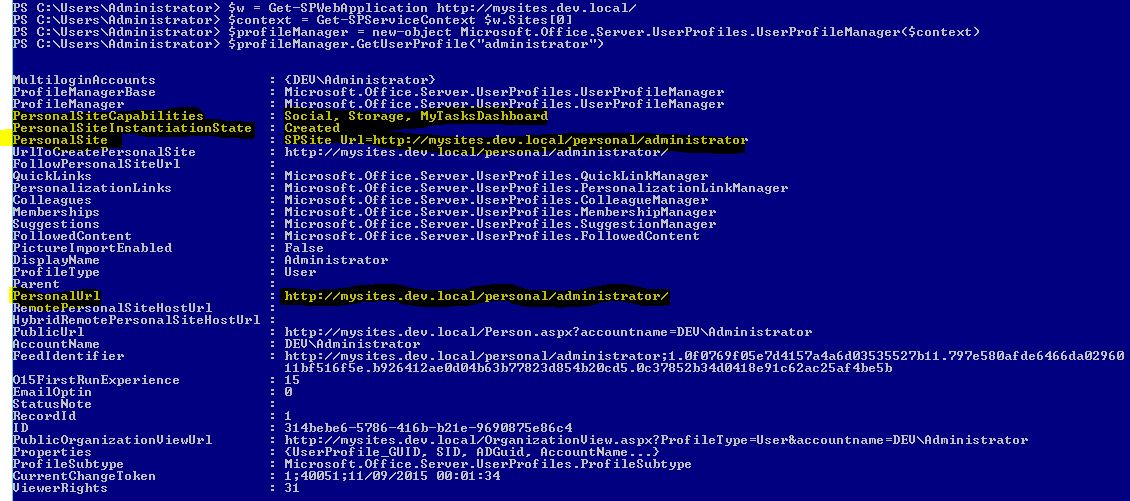
If a the My Site is deleted the properties will look like the following:
If you run the PowerShell script above to re-link the User Profile to another site it may look like this (most likely not with farm and Excel services account but just to give an example):
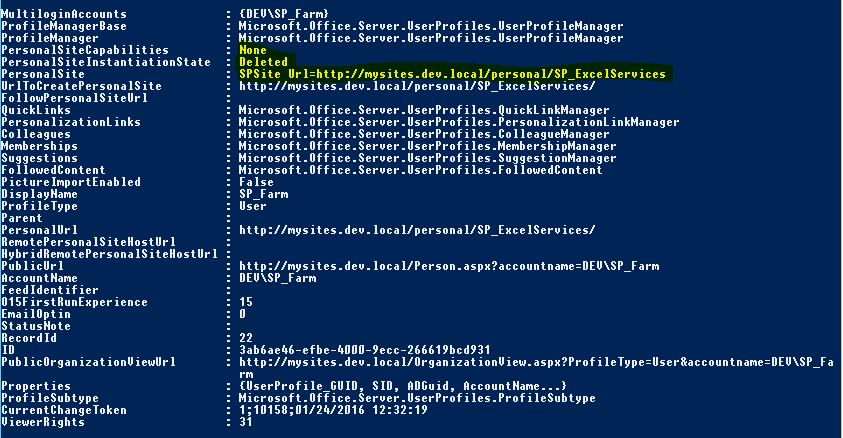
Note that the site is still marked as deleted. This does not seem to affect the functionality however you may change the properties using the PowerShell scripts below. Another approach could be to remove the User Profile altogether and have it re-created and then re-link it to the correct personal site.
Modify other user profile properties using PowerShell
PersonalSpace
Server relative Url to personal site.
Example:
$uProfile[“PersonalSpace”].Value = $siteCol.RootWeb.ServerRelativeUrl
PersonalSiteCapabilities
$uProfile[“SPS-PersonalSiteCapabilities”].Value = 13
Value 13 represents: Profile, Storage, MyTasksDashboard
For more info: https://msdn.microsoft.com/EN-US/library/office/microsoft.sharepoint.client.userprofiles.personalsitecapabilities.aspx
PersonalSiteInstantiationState
$uProfile[“SPS-PersonalSiteInstantiationState”].Value = 2
Value 2 represents: Created
For more info: https://msdn.microsoft.com/EN-US/library/office/microsoft.sharepoint.client.userprofiles.personalsiteinstantiationstate.aspx
Note: In SharePoint 2013 version 15.0.0.4779 it does not seem possible to set this property anymore. However if you want to do some ugly hacks in the User Profile Service application database you can:
UPDATE uProfile
SET PropertyVal = 2 -- PERSONAL SITE CREATED
FROM [SP__Profile].[dbo].[UserProfileValue] uProfile
INNER JOIN [SP__Profile].[dbo].[PropertyList] pl
ON pl.PropertyID = uProfile.PropertyID
AND pl.PropertyName = 'SPS-PersonalSiteInstantiationState'
INNER JOIN [SP__Profile].[dbo].UserProfile_Full pFull
ON pFull.RecordID = uProfile.RecordID
AND pFull.NTName = 'DEV\administrator'
For complete list of all user profile properties:
https://msdn.microsoft.com/en-us/library/office/jj679700.aspx
My Site Clean Up Job
SharePoint has a timer job that checks if any users have been deleted from your Active Directory. If it has it will remove the My Site for those users. So you can imagine what happens if you migrate your old user profile service database to your new environment: When the User Profile Service sync with your new Active Directory none of it’s profiles have a match and hence all MySites get’s scheduled for removal in 14 days. By default the users manager will get notified (if a manager is defined in the User Profile) after 11 days. In the My Site setup in central admin you may also specify a secondary owner that get notified in case this happens in order to save any documents/files before the site gets deleted. (I learned this the hard way by having all My Sites deleted – not very popular among the users 🙂 )
In order to avoid this ensure:
- All MySites have an owner which corresponds to a user in the new domain
- User Profile Service is correctly configured and that all user profiles (from the new domain) are linked to the correct MySite
- To be on the safe side disable the My Site Clean up Job before you have everything properly setup
You can read more about the My Site Clean Up Job here:
https://blogs.msdn.microsoft.com/kaevans/2012/06/25/inside-the-sharepoint-2010-my-site-cleanup-timer-job/
http://platinumdogs.me/2012/10/18/sharepoint-demystifying-user-profile-deletion-mysite-removal/
In case all your My Sites gets deleted you still have some hope. By default sites are moved to the central administration recycle bin (where they by default are kept for 30 days before actual deletion) and hence can be restored:
Get-SPDeletedSite -limit all | foreach { Restore-SPDeletedSite -Identity $_.SiteID }
However also keep in mind that after all sites are restored you their user profiles will be marked as deleted.
Migrated My Sites have orphaned owners
Site collections with owners that not have been mapped correctly or for any other reason are still referenced with the old domain needs to be taken care of:
PowerShell Scripts for My Site domain migration
Migrate farm user references from old domain to new
Add-PSSnapin Microsoft.SharePoint.PowerShell

# Format of CSV files:
# oldDomain,newDomain
# Old_Domain_Name\MacGregor,New_Domain_Name\U123456

$groupMappingsCSV = "D:\groupMappings.csv"
$userMappingsCSV = "D:\userMappings.csv"

$farm = Get-SPFarm

Import-Csv $groupMappingsCSV | ForEach-Object{
    Write-Host "Migrating group" $_.oldDomain "->" $_.newDomain -ForegroundColor Gray
    $farm.MigrateGroup($_.oldDomain, $_.newDomain)
}

Write-Host "Group migration completed" -ForegroundColor Green

Import-Csv $csvFile | ForEach-Object{
    Write-Host "Migrating user" $_.oldDomain "->" $_.newDomain -ForegroundColor Gray
    $farm.MigrateUserAccount( $_.oldDomain, $_.newDomain, $false )
}

Write-Host "User migration completed" -ForegroundColor Green
Fix individual user profile properties
# Script to fix individual MySite when migrating to new domain
# Assuming user has same name in new domain
# To work:
# Modify $siteToFix, $oldDomain, $newDomain to fit your environment
#
# // Jonas Widriksson, 2016

$siteToFix = "http://mysites.dev.local/personal/administrator"
$oldDomain = "Old_Domain_Name"
$newDomain = "New_Domain_Name"

Add-PSSnapin "Microsoft.SharePoint.PowerShell"

#Instantiate Web Application Object
$webApplication = Get-SPWebApplication -Identity $siteToFix

#Create Service Context for User Profile Manager
$context = Get-SPServiceContext $webApplication.Sites[0]

#Get User Profile Manager instance
$profileManager = new-object Microsoft.Office.Server.UserProfiles.UserProfileManager($context)


[Microsoft.SharePoint.SPSecurity]::RunWithElevatedPrivileges({

    #Iterate through site collection in My Site Host web application
    $siteCol = Get-SPSite -Identity $siteToFix

	try{
		Write-Host "Start site: " $siteCol.Url -ForegroundColor Cyan
		Write-Host "Site owner: " $siteCol.Owner.LoginName -ForegroundColor Gray

        if ($siteCol.Owner.Login -ilike "$oldDomain*") {
            Write-Host "Site owner not new domain... fixing... " $siteCol.Owner.LoginName -ForegroundColor Green
            $newLogin = ($siteCol.Owner -ireplace $oldDomain, $newDomain)
            Set-SPSite -Identity $siteToFix -OwnerAlias $newLogin
        }

        if ($siteCol.CompatibilityLevel -eq '14') {
            Write-Host "Upgrading site..." -ForegroundColor Green
            upgrade-spsite $siteCol.Url -versionupgrade
            Write-Host "Upgrade complete!" -ForegroundColor Green
        }

	    $uProfile = $profileManager.GetUserProfile($siteCol.Owner.LoginName -ireplace "$newDomain\\", "")

        if ($uProfile) {
            Write-Host "Found userprofile: " $uProfile.DisplayName -ForegroundColor Gray
		    Write-Host "User personal site: " $uProfile.PersonalSite.ServerRelativeUrl -ForegroundColor Gray

            Write-Host -ForegroundColor Green "Change new mysite to: " $siteCol.RootWeb.ServerRelativeUrl

            $uProfile["PersonalSpace"].Value = $siteCol.RootWeb.ServerRelativeUrl
            $updateProfile = $true

        # Check so that site is activated
        if ($uProfile["SPS-PersonalSiteCapabilities"].Value -eq $null -or $uProfile["SPS-PersonalSiteCapabilities"].Value -eq 0) {

            Write-Host -ForegroundColor Red "Personal Site has no capabilities"
            Write-Host -ForegroundColor Green "Updating capabilities" $siteCol.RootWeb.ServerRelativeUrl

            $uProfile["SPS-PersonalSiteCapabilities"].Value = 13
            $updateProfile = $true
        }

        # Check so that site is not marked as deleted
        if ($uProfile["SPS-PersonalSiteInstantiationState"].Value -eq $null -or $uProfile["SPS-PersonalSiteInstantiationState"].Value -eq 0 -or $uProfile["SPS-PersonalSiteInstantiationState"].Value -eq 3) {

            Write-Host -ForegroundColor Red "Site marked as deleted or not created"
            Write-Host -ForegroundColor Green "Updating site as created" $siteCol.RootWeb.ServerRelativeUrl

            $uProfile["SPS-PersonalSiteInstantiationState"].Value = 2
            $updateProfile = $true
        }

          if ($updateProfile) {
            Write-Host "Commit changes to UPS..." -ForegroundColor Green
            $uProfile.Commit()
        }

        }
        else {
            Write-Host "No Profile found!" -ForegroundColor Red
        }
        Write-Host "End..." -ForegroundColor Cyan

}
    catch{
        Write-Host "Error: " $_ -ForegroundColor Red
		$ownerLoginName = $siteCol.Owner.LoginName
		Add-Content .\UpdateMySiteUserProfilesLinkErrorNew.txt "User: $ownerLoginName $_"
	}

})
Fix all user profiles properties and map accordingly with CSV file
# Script to fix MySites when migrating to new domain
# The script does the following:
# Upgrade site to SP2013 if needed
# Update site owner:
#     - By reference in mapping file
#     - By replacing old domain name with new domain name
#
# Update site groups:
#     - By reference in mapping file
#     - By replacing old domain name with new domain name
#
# Updates user properties if they are invalid
#     - PersonalSpace
#     - PersonalSiteCapabilities
#     - PersonalSiteInstantiationState
#
# (you might want to tweak the check of PersonalSpace update to force an update
#  if PersonalSpace has already has an Url but it's invalid)


# To work:
# Modify $siteToFix, $oldDomain, $newDomain to fit your environment
# CSV File in following format: (without domain name included)

# Old|New
# oldAcconut1|newAccount1
# oldAccount2|newAccount2

# // Jonas Widriksson, 2016

$siteToFix = "http://mysites.dev.local/personal/administrator"
$oldDomain = "Old_Domain_Name"
$newDomain = "New_Domain_Name"
$csvFile = "D:\AD_Mapping.csv"

Add-PSSnapin "Microsoft.SharePoint.PowerShell"


$webApplication = Get-SPWebApplication -Identity $siteToFix
$context = Get-SPServiceContext $webApplication.Sites[0]
$profileManager = new-object Microsoft.Office.Server.UserProfiles.UserProfileManager($context)
$farm = Get-SPFarm

$mappings = Import-Csv $csvFile -Header OldAccount, NewAccount -Delimiter '|' -Encoding UTF8

[Microsoft.SharePoint.SPSecurity]::RunWithElevatedPrivileges({

#Iterate through site collection in My Site Host web application
foreach($siteCol in $webApplication.Sites | where { ($_.RootWeb.WebTemplateId -eq  21) } ) {
try{
	Write-Host "------ Start site ------ : " $siteCol.Url -ForegroundColor Cyan
	Write-Host "Site owner: " $siteCol.Owner.LoginName -ForegroundColor Gray

    # $keyb = Read-Host -Prompt "Waiting for key press..."

    # Check upgrade status
    if ($siteCol.CompatibilityLevel -eq '14') {
        Write-Host "Upgrading site..." -ForegroundColor Green
        upgrade-spsite $siteCol.Url -versionupgrade
        Write-Host "Upgrade complete!" -ForegroundColor Green
    }

    $siteOwnerLoginName = $siteCol.Owner.LoginName

    # Check site owner
    if ($siteCol.Owner -ilike "$oldDomain*") {
        Write-Host "Site owner not new domain... fixing... " $siteCol.Owner.LoginName -ForegroundColor Green

        $userMap = $mappings | Where-Object OldAccount -ilike  ($siteCol.Owner.LoginName -ireplace "$oldDomain\\", "")

        if ($userMap) {
            Write-Host "Found mapping: " $userMap.OldAccount " -> " $userMap.NewAccount -ForegroundColor Gray
            $newLogin = "$newDomain\" + ($userMap.NewAccount)
        }
        else {
            Write-Host "No mapping found. Trying to replace $oldDomain -> $newDomain" -ForegroundColor Gray
            $newLogin = ($siteCol.Owner -ireplace $oldDomain, $newDomain)
        }


        Set-SPSite -Identity $siteCol -OwnerAlias $newLogin

        $siteOwnerLoginName = $newLogin
    }

    # Check site groups/users
    $group = $siteCol.RootWeb.SiteUsers
    foreach ($grp in $group) {
        if($grp.IsDomainGroup -eq "True") {
            if($grp.LoginName -ilike "$oldDomain*") {
                Write-Host "Group name: " $grp.Name
                Write-Host "Group LoginName: " $grp.LoginName

                $oldGroupName = $grp.LoginName

                $userMap = $mappings | Where-Object OldAccount -ilike ($grp.LoginName -ireplace "$oldDomain\\", "")

                if ($userMap) {
                    Write-Host "Found group mapping: " $userMap.OldAccount " -> " $userMap.NewAccount -ForegroundColor Gray
                    $newLoginName = "$newDomain\" + ($userMap.NewAccount)
                }
                else {
                    Write-Host "No group mapping found. Trying to replace $oldDomain -> $newDomain" -ForegroundColor Gray
                    $newLoginName = ($oldGroupName -ireplace $oldDomain, $newDomain)
                }

                if ($oldGroupName -ne $newLoginName) {
                    Write-Host "Migrate group: " $newLoginName  -ForegroundColor Green
                    $farm.MigrateGroup($grp.LoginName, $newLoginName)
                    Write-Host "Migration group done!" -ForegroundColor Green
                }
            }
        }
    }

    # Check profile
	$uProfile = $profileManager.GetUserProfile($siteOwnerLoginName)

    if ($uProfile) {
        Write-Host "Found userprofile: " $uProfile.DisplayName -ForegroundColor Gray
		Write-Host "User personal site: " $uProfile.PersonalSite.ServerRelativeUrl -ForegroundColor Gray

        $updateProfile = $false

        if($uProfile.PersonalSite -eq $null)
        {
            #If link has been removed, update the user profile
            Write-Host -ForegroundColor Red "Personal Site is not linked"
            Write-Host -ForegroundColor Green "Updating the link" $siteCol.RootWeb.ServerRelativeUrl

            # Update personalspace
            $uProfile["PersonalSpace"].Value = $siteCol.RootWeb.ServerRelativeUrl
            $updateProfile = $true
        }

        # Check so that site is activated
        if ($uProfile["SPS-PersonalSiteCapabilities"].Value -eq $null -or $uProfile["SPS-PersonalSiteCapabilities"].Value -eq 0) {

            Write-Host -ForegroundColor Red "Personal Site has no capabilities"
            Write-Host -ForegroundColor Green "Updating capabilities" $siteCol.RootWeb.ServerRelativeUrl

            $uProfile["SPS-PersonalSiteCapabilities"].Value = 13

            Add-Content .\ErrorLog.txt "PersonalSiteCapabilities: 13, $siteCol.Url"

            $updateProfile = $true
        }

        # Check so that site is not marked as deleted
        if ($uProfile["SPS-PersonalSiteInstantiationState"].Value -eq $null -or $uProfile["SPS-PersonalSiteInstantiationState"].Value -eq 0 -or $uProfile["SPS-PersonalSiteInstantiationState"].Value -eq 3) {

            Write-Host -ForegroundColor Red "Site marked as deleted or not created"
            Write-Host -ForegroundColor Green "Updating site as created" $siteCol.RootWeb.ServerRelativeUrl

            $uProfile["SPS-PersonalSiteInstantiationState"].Value = 2

            Add-Content .\ErrorLog.txt "PersonalSiteInstantiationState: 2, $siteCol.Url"

            $updateProfile = $true
        }

        if ($updateProfile) {
            Write-Host "Commit changes to UPS..." -ForegroundColor Green
            $uProfile.Commit()
        }

    }
    else {
        Write-Host "No Profile found!" -ForegroundColor Red
    }
    Write-Host "----- End -----" -ForegroundColor Cyan

    $siteCol.Dispose

}
    catch{
        Write-Host "Error: " $_ -ForegroundColor Red
		$ownerLoginName = $siteCol.Owner.LoginName
		Add-Content .\ErrorLog.txt "User: $ownerLoginName $_"
        $siteCol.Dispose
	}
    }

})