Monthly Archives: May 2014

Configure SharePoint 2013 BI Services

This guide will show you how to setup and configure SharePoint 2013 BI (Business Intelligence) services. The guide will cover the following BI services and features:

  • Excel Services
  • Reporting Services
  • Performance Point Services
  • PowerView

We will be using PowerShell for most of the setup and configuration tasks. This will not only speed up the process but will also ensure that it is done in the same way the next time you do it. We will also use PowerShell to provision application pools and user accounts to have one service account for each BI service application. This post is the third post in the series of posts with the theme SharePoint 2013 BI Development Environment:

SharePoint 2013 BI Development Environment tutorial

  1. SharePoint 2013 development environment using Virtualbox
  2. Install SharePoint 2013 SP1 using AutoSPInstaller
  3. >Configure SharePoint 2013 Business Intelligence Services<
  4. SharePoint 2013 Business Intelligence kerberos configuration

Even though this post assumes you have done the previous guides above you can still adapt it to your own environment. Just ensure to change computer/accounts names etc.

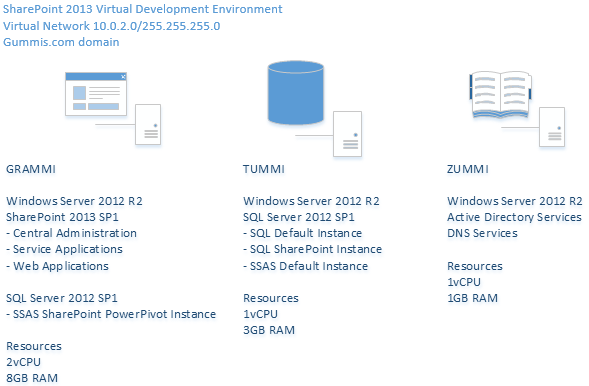
If you have followed the previous articles you are now familiar with the picture below, presenting a diagram of the servers in our setup:

sharepoint2013_virtual_environment

If you are a bit familiar with SharePoint setup and BI configuration you have already noticed that in order for our BI services to work properly with user delegation (be able use “current user” login on our BI data sources, cubes, reports etc.) we will need to configure kerberos. This is due to limitations with NTLM and s double hop scenario. This will be described in the 4th post: SharePoint 2013 Business Intelligence kerberos configuration (upcoming).

However we will still be able to use our BI data source if we configure unattended service access accounts for our BI services which is described in additional configuration section of this post.

Contents

Prerequisites

Before continuing ensure you have already have the following setup (please note that certain combinations of the software below with lower versions e.g .not SP1 of SQL/SharePoint which might not work properly together):

  • Microsoft SQL Server 2012 SP1 Installation medium
  • Office 2013 Professional Installation medium (For testing purposes)
  • SharePoint Server/Virtual machine with:
    • Windows Server 2012 R2
    • SharePoint 2013 SP1
  • SQL Server/virtual machine with:
    • Windows Server 2012 R2
    • SQL Server 2012 SP1 CU8 (Cumulative Update 8)
    • SQL Services instances for intended BI services you would like to use:
      • Analysis Services (Multidimensional/Tabular)
      • PowerPivot for SharePoint instance

Prepare sercice accounts

Make sure you have setup the following services accounts from the previous post, Install SharePoint 2013 SP1 using AutoSPInstaller then configure their security rights as specified in table below. Access rights on service application databases etc will be taken care of when they are provisioned using PowerShell script later.

Account Security settings
SP2013_ExcelServices

Excel Services

Security rights:
Admin on Analys Services (SSAS) for SharePoint instance (GRAMMI\POWERPIVOT).

On SQL Server, locate Central Administration database (Usually SharePoint_AdminContent). Expand security folder –> add/open setttings for SP2013_ExcelService account –> in the mappings settings tick the SPDataAccess role checkbox –> OK.

SP2013_PowerPivot

PowerPivot Services

Security rights:
Admin on Analys Services (SSAS) for SharePoint instance. (GRAMMI\POWERPIVOT)

SP2013_PPS

Performance Point Services

Security rights:
No additional settings except what is done automatically when provisioning service application.

SP2013_RS

Reporting Services

(Note, if you plan to configure kerberos later read this: when using reporting services in integrated mode with reporting services service application on the same server as your site web application the web application and reporting services service application need to use the same service account!)

In this setup the SP2013_WepApp will be used as service account for reporting services and no dedicated reporting services account will be used.

Security rights:
Admin rights on Analys Services (SSAS) for SharePoint instance. (GRAMMI\POWERPIVOT)

(Needed if you would like to use PowerPivot as source for PowerView reports)

Admin rights on Analys Services (SSAS) tabular instances that you which to use as source for PowerView.

SP2013_WebApp

Site web application pools

Security rights:
Read text in red and security rights for SP2013_RS account.

SP2013_Install

Installation account

This account will be used for installation and configuration of the BI services with the exception of PowerPivot Configuration Tool which have some issues to detect proper user permissions. (described later)

Security rights:
Member of Local Administrators security group.
Member of Central Administrators group in Central Administration.

SP2013_DataAccess

Unattended Data Access account

Security rights:
Read access to all data sources used by BI services.
(TUMMI default SQL, TUMMI default SSAS)

Note: If you are going for kerberos configuration later you might not need this account.

To add account as administrator on an analysis services instance, connect to the instance in management studio -> right click instance name -> properties -> security tab -> add accounts.

Note: If you have problem to open the properties window of analysis services this might be that you have not applied latest cumulative update (CU) of SQL Server. (This tutorial uses CU8)

Install required software

SharePoint 2013 relies on several add-ins that are a part of Microsoft SQL Server. Download and install the add-ins/software that is required for the services that you wish to use. All software in this post should be installed on your SharePoint 2013 application server running the service(s) you wish to install.

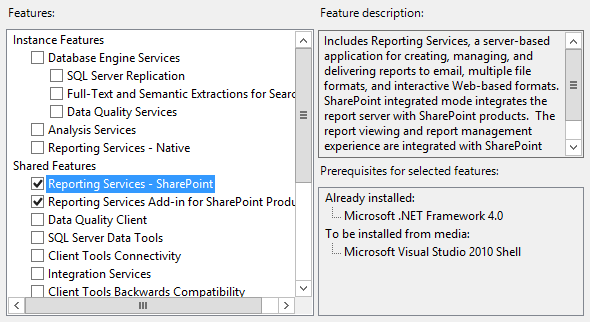
Reporting Services add-in

Install Reporting Services for SharePoint and the Reporting Services add-in from the SQL Server 2012 SP Installation media on your SharePoint Application Server (GRAMMI).

sql server reporting services feature installation

Note: The Reporting Services – SharePoint feature add shared features for reporting services. Even though you are able to install only the Reporting Services Add-in without Reporting Services – SharePoint feature this will not work since you will have issues later when creating service applications etc.

This tutorial is tested with SQL Server CU8 where the reporting services add-in is bundled. Go to the link below, request the ssrs add-in (2012_SP1_RSShrPnt_CU8_2917531_11_0_3401_x64). (You will get a download link by e-mail))

http://support.microsoft.com/kb/2917531

Install and upgrade the Reporting Services add-in to CU8.

PowerPivot for SharePoint

  • Install SQL Server PowerPivot for SharePoint instance 

    For more detailed information see:
    http://msdn.microsoft.com/en-us/library/jj219067.aspx

    Run setup from your SQL Server 20012 SP1 installation medium.
    Select SQL Server PowerPivot for SharePoint:
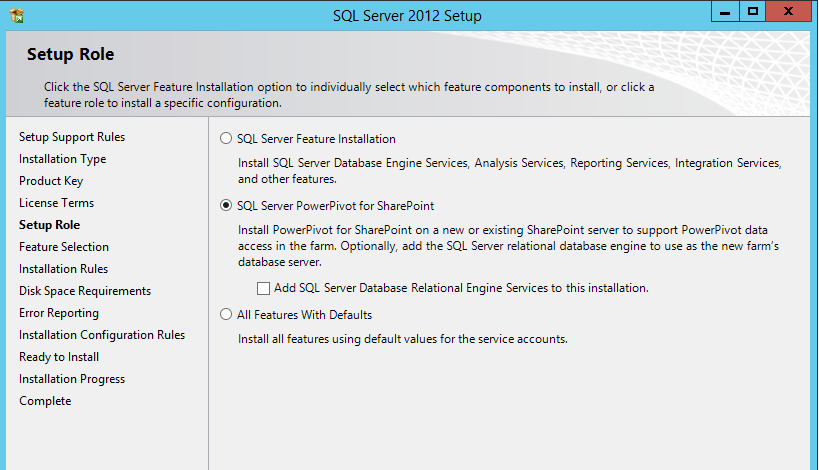
    sql_7_powerpivot

  • Add Management Tools Complete feature during features selection
  • Configure service accounts:
    sql_8_powerpivot_service_accounts
  • Do not forget to add yourself/domain admin account as administrator account.
  • Finish the rest of the steps in the SQL Server Feature installation wizard.
  • Install and apply SQL Server CU8
  • Download and install PowerPivot for SharePoint 2013 Add-In from:
    http://www.microsoft.com/en-us/download/details.aspx?id=35577

Performance Point SQL 2008R2 ADOMD.Net provider

Allthough SQL 2012 ADOMD.Net provider is installed when installing other SQL Server features (such as PowerPivot above) Performance Point in SharePoint 2013 still needs ADOMD.Net for SQL Server 2008 R2. Download and install it from:

http://www.microsoft.com/en-us/download/details.aspx?id=16978

Click download and scroll down to:
Microsoft® SQL Server® 2008 R2 ADOMD.NET
Install both the 32 & 64 bit version.

Configure SharePoint 2013 BI Services

Run PowerPivot Configuration Tool for SharePoint 2013

For detailed information on PowerPivot configuration please see:
http://msdn.microsoft.com/en-us/library/jj682085(v=sql.110).aspx

We will configure PowerPIvot in three steps involving:

  1. Initial configuration (done in this step)
  2. Provision Powerpivot Service Application (done in next step)
  3. Configure unattended data refresh account and active site features

The PowerPivot Configuration tool will be used in step 1 and 2 above. Find PowerPivot Configuration tool in the start menu/start screen (make sure you start the one for SharePoint 2013 and not 2010).

Note: You might get the error message:

“The user is not a farm administrator. please address the validation failures and try again.”

This is a bit misleading since even if your installation account is farm administrator and local administrator the configuration tool does not seem to pick it up. To solve this issue add your farm account to local administrators group. Logout and login again. Right click PowerPivot Configuration tool and run as administrator. (Remove farm account from local administrators group when done with the rest of the steps in this post)

Go through the configuration settings.

Configure default account. (GUMMIS\SP2013_Farm) and type in password.

Make sure to not create the service application in this step:

PowerPivot Configuration Tool SP2013 Wait Service Application

Click verify and then run to complete this task.

Provision BI Service applications using powershell

You may configure all service applications in this tutorial through the user interface in Central Adminstration (or have them configured automatically when installing SharePoint using the default installer. However for more complex setups I like to use PowerShell and also configure each service application with its own application pool and service account. This makes it easier for troubleshooting, improved security and more flexibility to scale up you farm.

I have put together a PowerShell Script to configure and provision SharePoint 2013 BI service applications. Download it here:

Configure SharePoint 2013 BI Services.ps1 (zipped PowerShell script)

In the beginning of the script there are parameters to configure which service applications you which to provision. There is also a parameter to configure Claims To Windows Token account – we will do this later in upcoming post: SharePoint 2013 Business Intelligence kerberos configuration (upcoming)

For this tutorial configure the script to provision:

  • Reporting Services
  • Excel Services
  • PowerPivot Services
  • PerformancePoint Services

Run the script from PowerShell with the SharePoint installation account or other account with enough permissions. (farm administrator)

Note: You might get some error messages/warnings indicating that some services already are started or enabled depending on the state of your environment.

If everything goes ok you will now have one application pool with one service account for each service. You can look up SharePoint applicaiton pools with the following powershell script:

Get-SPServiceApplicationPool | Select Id, Name, ProcessAccountName

Also verify that all the service applications and proxies have been created in the “Manage Service Applications” page in Central Administration.

If anything goes wrong with the script try to figure out the error messages, remove created databases, service applications and application pools and try to correct the problem and run again. (Use the Get-SPServiceApplicationPool to find out the ID name of your application pool and then remove them from IIS Manager (inetmgr))

Additional configuration steps to complete setup

The following steps creates unattended service accounts for each BI service and other settings. When done you will have 3 unattneded accounts in Central Administration -> Manage Service applications -> Secure Store:

secure store accounts


If you do not want to have one account for each service you may also configure one custom secure store account and then use only one account for all desired services.

Reporting Services

  • Add service account for reporting services as sysadmin to PowerPivot instance (GRAMMI\LOCALHOST)
    (Open in SQL Management Studio, right click instance, security tab, add user (SP2013_WebApp)
  • In central administration -> Application Management -> Manage Service applications -> Reporting Services Service application, configure the following:
    • Mail
    • Provision Subscriptions and Alerts
      • Download Script
      • Logon to SQL Server and run the downloaded script
      • Back in central administration: Enter Username and password with account (SP2013_Install) that has sufficient permissions on the SQL server and press OK.
  • Verify that Reporting Services and PowerView features are enabled in site collections and sites where you wish to use them.

Excel Services

  • Add service account for excel services as sysadmin to PowerPivot instance (GRAMMI\LOCALHOST)
  • In central administration -> Application Management -> Manage Service applications -> Excel Services Service application, configure/verify the following:
    • Unattended refresh account:
      Secure Store Excel Services
    • Data Model Server
      Set to LOCALHOST\POWERPIVOT
    • Trusted Data Sources
    • Trusted File Locations
  • Verify that SharePoint Enterprise Site Collection and Site Features is enabled in site collections and sites where you wish to use Excel Services.

PowerPivot Services

  • Add service account for PowerPivot service application as sysadmin on PowerPivot instance (GRAMMI\LOCALHOST)
  • Login as farm administrator account. (make sure account also is local admin)
  • Start PowerPivot for SharePoint 2013 Configuration tool.
  • Enter password for default account (SP2013_Farm)
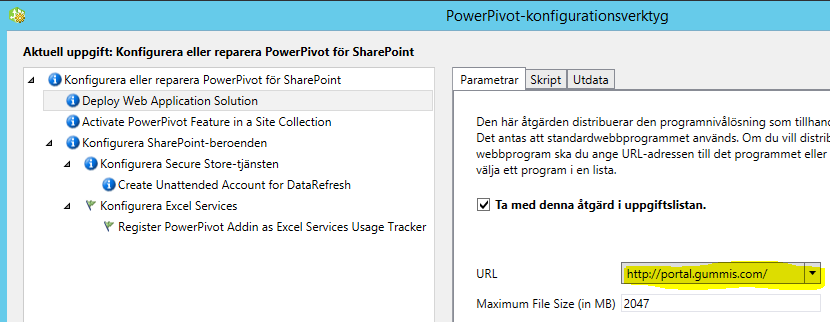
  • Select your target web application:
    powerpivot site configuration
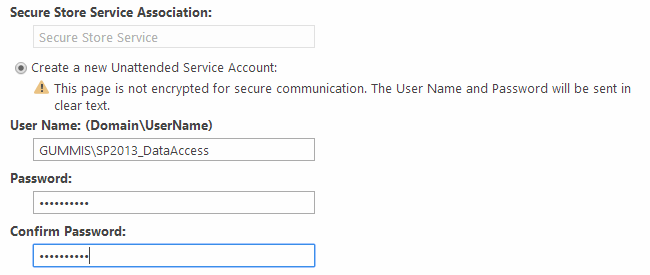
  •  Configure account for unattended data refresh (SP2013_DataAccess):
    powerpivot unattened data refresh account
  • Click verify (Run will not be enbled) -> If everything goes well you will see that PowerPivot Features and have been enabled and that you unattended account is created in secure store service application.
  • Ensure PowerPivot Feature Integration for Site Collections feature is enabled in the site collections where you wish to use it.

Performance Point Services

  • Configure secure store account (SP2013_DataAccess)
  • Configure PerformancePoint services trusted file location and authentication settings
  • Ensure PerformancePoint Site Collection and site features are enabled in the site collections and sites where you wish to use it.

Test and verify

Note: This test will be without kerberos which will be discussed in another upcoming post. Since kerberos is not enabled yet we need to use a combination of service accounts (SQL/Windows/Secure Store) to make all services work. This will only be covered briefly since there are several different authentication types, data source providers and data sources available for use. Do tests that suits for your own needs.

Add portal to trusted sites in Internet Explorer

Configure service and access accounts on your SQL/SSAS instances

  • Ensure your unattened access account has read access to all data sources you intend to use (SP2013_DataAccess)
  • Ensure your SSAS Service account (SQL2012_Services) have administrator rights on your SQL Server data instance (TUMMI default isntance)

Install software

Install Office 2013 on SharePoint machine (GRAMMI) or any other machine that you would like to use as client for testing)

Install SQL Server Data Tools (former BIDS) on SQL machine (TUMMI or any other machine that you wish to use for SQL/SSRS/SSAS development)

Install sample data

Microsoft provides its classic AdventureWorks database with models for multidimensional and tabular cubes which you can use for testing purposes in your environment if you do not have any other data available. I will only provide basic steps here so please read instructions for howto deploy AdventureWorksDW and projects properly.

http://msftdbprodsamples.codeplex.com/releases/view/55330

  • Download: AdventureWorksDW2012_Data.mdf
  • Attach mdf file to default SQL instance on TUMMI (or if you have other instances/names) with the following script:
    CREATE DATABASE AdventureWorksDW2012
    ON (FILENAME = '<PATH__TO>\AdventureWorksDW2012_Data.mdf')
    FOR ATTACH_REBUILD_LOG;

Note: You might need to enable named pipes in SQL Configuration Manager for the script to work.

  • Download AdventureWorks Multidimensional Models SQL Server 2012.zip
  • You will need to re-configure the data source and enter deployment properties for the projects in Visual Studio before you deploy them.
  • Deploy the multimdensional project to the default SSAS instance (TUMMI)

Configure test site

  • Create a new subsite, use the PowerPivot Site Template
  • Enable Enterprise, Performance Point, BI Data Connection Library and other features you wish to use.
  • Add the following apps:
    • Data Connection Library
    • PerformancePoint Content Library
    • PerformancePoint Data Connection Library
  • Add Reporting Services Content Type to the existing PowerPivot Library (Included in PowerPivot site template)
    (PowerPivot Library -> Library tab -> Library Settings -> Advanced settings -> Allow management of content type -> back to Library settings -> Add Content Type -> Add Report Builder Report.
  • Add BI Semantic Data model, Reporting Data Source and Report Data Model Content Types to Data Connections Library

Test Excel Services

Add an excel document to PowerPivot gallery and verify that you can open the document in the web-browser.

Test PowerPivot Services

  • Create an excel document with a PowerPivot model that has your SQL server (TUMMI default instance) as data source. 
  • In Excel: Data tab -> Connections -> Select connection to SQL server (TUMMI) -> Properties -> Definition -> Authentication Settings -> None.
  • This will make the workbook data refresh use the unattended account that you configured earlier.
  • Add the document to the PowerPivot gallery.
  • Verify that you can open and refresh the data source.

Test Reporting Services and PowerView

  • In PowerPivot Gallery hover over the document you created before, in the upper right corner click the create powerview report.

    Note: If report cannot load make sure that you have configured the service account for reporting services service application as system administrator on the PowerPivot instance.

Test reporting services and report builder

  • In PowerPivot Gallery -> File tab -> New -> Report Builder Report (If the report builder tool does not download make sure you have installed CU8) -> Run and install report builder report -> create a test report against SQL/SSAS data source on SQL server (TUMMI), make sure to use a system account (SP2013_DataAccess) to access the data source. Enter the user information under the credential tab. 

    Note: You might need to add your current user to have read access to the datasource when building the report.

  • You will need to use a system account if your current user not is added to the data source you wish to use. Save and test the report in PowertPivot Gallery.

Test Performance Point Services

  •  Open the Performance Point Content List
  • In Performance Point tab -> Open dashboard designer
  • Create a new datasource, use unattended service account as credentials.
  • Add a new report
  • Save and publish to site and verify that they work.

    Note: You might need to add your site to Internet Explorer Trusted sites for Performance Point Dashboard Designer to work properly.


Install SharePoint 2013 SP1 using AutoSPInstaller

AutoSPInstaller is a set of PowerShell scripts and directory structure that helps to automate SharePoint installations. This tutorial assumes that you already have installed Windows Server 2012 R2 and SQL Server SP1 from the post Setup virtual SharePoint 2013 development environment using Oracle Virtualbox. This is however not a necessity as long as you change computer names, references and user accounts to match your own setup.

Some of the benefits of using AutoSPInstaller to install your SharePoint servers are:

  • The configuration XML file of AutoSPInstaller works like a checklist which can improve the quality of your installations. (For example properly configured service accounts and other security rights, less “quick-fixes” after installation is complete etc…)
  • Automated installation reduce installation and configuration time.
  • Since there are less manual work involved you know that when you do the installation the next time it will be exactly as last time (hopefully – would not make any promises here. After all, it is still SharePoint :))

The architecture of the SharePoint 2013 farm:

sharepoint2013_virtual_environment

This post is the second post in the series of posts with the theme SharePoint 2013 BI Development Environment which includes the following topics:

SharePoint 2013 BI Development Environment tutorial

  1. SharePoint 2013 development environment using Virtualbox
  2. >Install SharePoint 2013 SP1 using AutoSPInstaller<
  3. Configure SharePoint 2013 Business Intelligence Services
  4. SharePoint 2013 Business Intelligence kerberos configuration

Contents

Prerequisites

Below is required software installation medium/ISO files

  • Microsoft Windows Server 2012 R2
  • Microsoft SharePoint Enterprise Server 2013 SP1 (Note that enterprise is required for Business Intelligence features)

Prepare environment

SharePoint 2013 service accounts

In Active Directory Computers And Users create the following service accounts:

Account Description
SP2013_C2WTS Claims to windows token services
SP2013_Crawl Search crawl
SP2013_ExcelServices Excel Services
SP2013_Farm Farm account
SP2013_PowerPivot Power Pivot Services
SP2013_PPS Performance Point Services
SP2013_Profiles Profile Services Application & sync
SP2013_RS Reporting Services
SP2013_Search Search Services
SP2013_Services Various services
SP2013_WebApp Used for web application pools
SP2013_Install Installation account
SP2013_DataAccess Used for unattended data access for BI services

Configure Installation account access

  • Add account SP2013_Install to local admin on SharePoint server (Grammi).
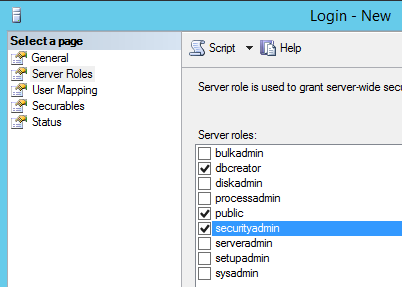
  • Create a login to SP2013_Install on SQL Server (Tummi). Assign the login dbcreator, securityadmin roles:

sp2013 sql install account permissions


AutoSPInstaller will take care of any other permissons needed.

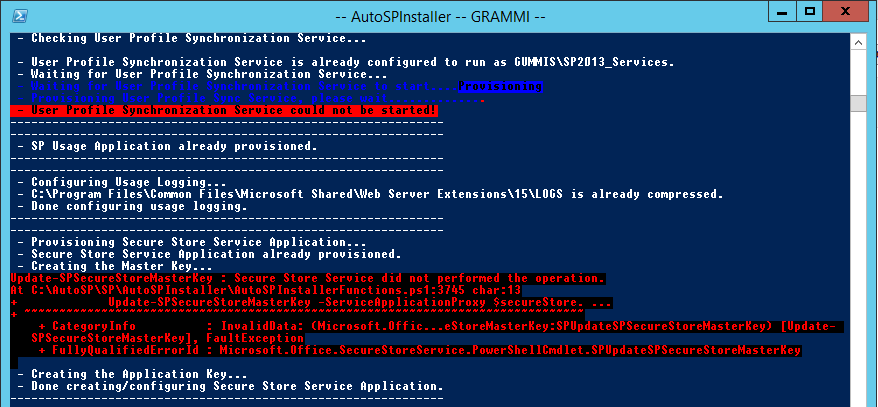
Note: If you are lazy and try to run as the domain administrator account you might get this error(s):
secure store error

So take the time to create the installation account 🙂

Prepare for user profile synchronization

Login to your domain controller machine. (created as virtual server Zummi in previous post)

  1. Open Active Directory Users and Computers.
  2. Right click your domain (gummis.com in this tutorial)
  3. Select Delegate Control…
  4. Next -> Add SP2013_Profiles (Created in in previous post) Click next.
  5. Select create a custom task to delegate. Click next.
  6. Select This folder, existing objects in this folder and creation of new objects in this folder. Click next.
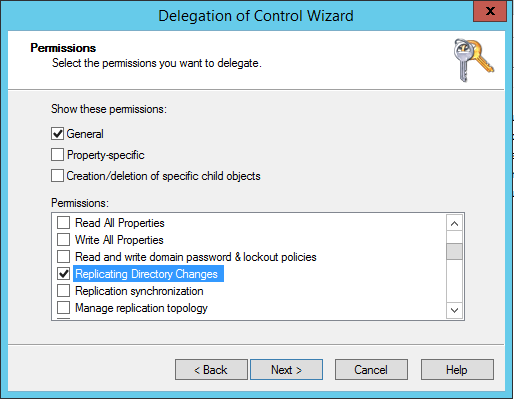
  7. Select replicating directory changes:
    ad delegation replicating directory changes
    Click next, finish.

Configure DNS

Prepare app domain

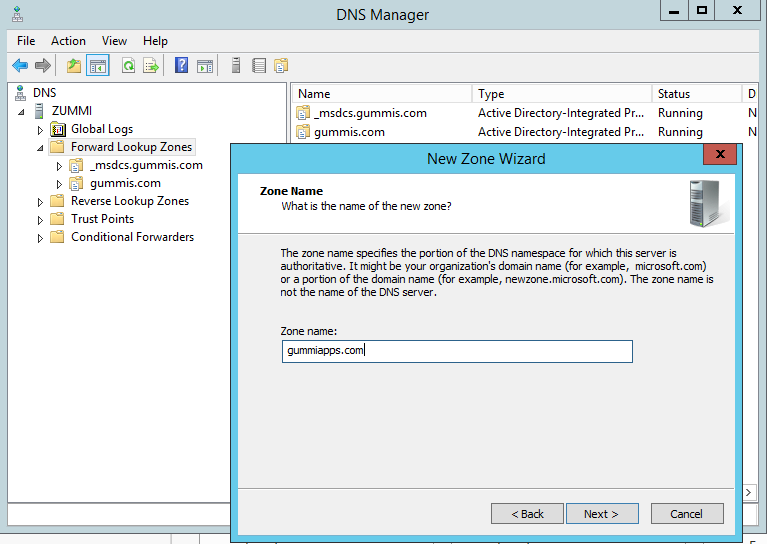
Login to your domain controller machine. (created as virtual server Zummi in previous post) Apps in SharePoint 2013 are running in a different domain. Hence we need to setup that domain in the DNS Manager. Right click Forward Lookup Zones. Go through the wizard excpet where to enter your domain name: gummiapps.com (or whatever name you would like to use). dns manager sharepoint app domain

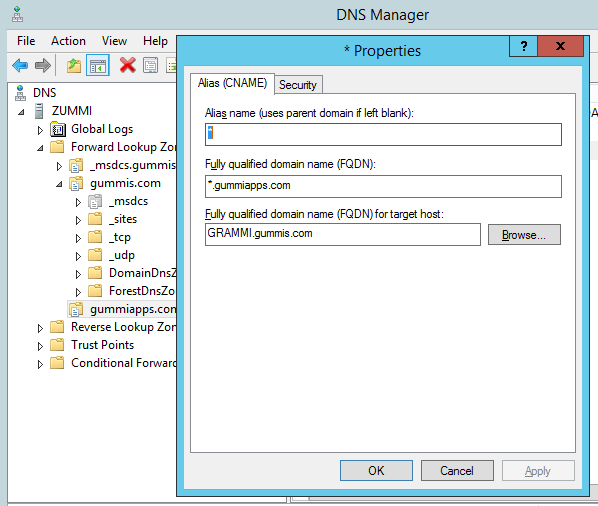
Right click your newly created domain. Select new alias (CNAME). Fill in properties as shown below:

dns manager sharepoint app domain


Add web application(s) DNS a records

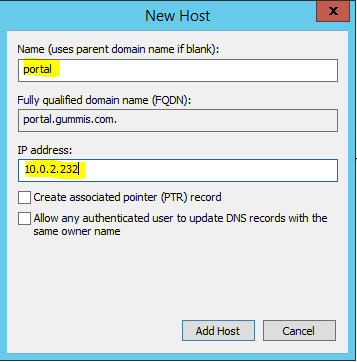
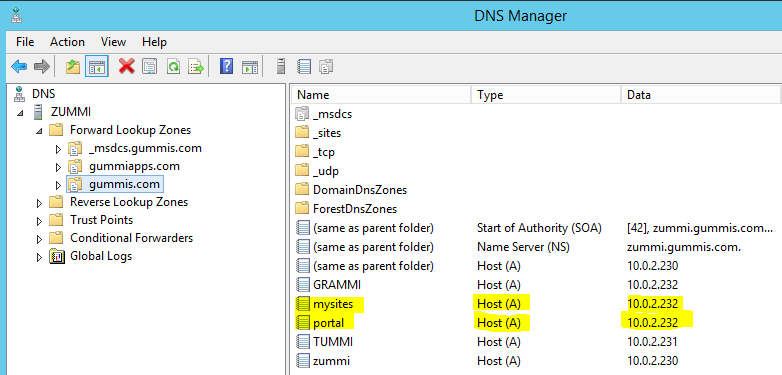
To properly be able to access your web application with alternate access mappings and to later on configure kerberos add A records for your web applications (portal and mysites – will be configured in AutoSPInstaller later) by right click your domain (gummis.com) –> Add A record:

dns manager add portal


When done the configuration should look as below:

dns manager a records

Disable UAC and IE Enhanced protection

Login to your SharePoint server machine. (created as virtual server Grammi in previous post). In Server Manager –> Local Server disable IE enhanced protection:

disable_IE_enhanced_security

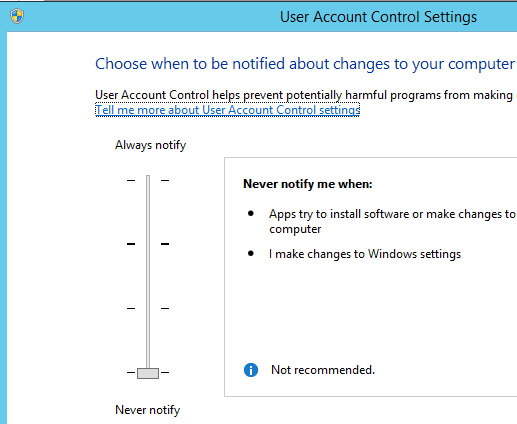
In User Account Control Settings disable UAC:

disable uac

Download and prepare sources

Login to your SharePoint machine using a domain account. In this tutorial I login as domain administrator. For a production environment it would be recommended to use an installation account. For more information on SharePoint user accounts and requirements see: http://absolute-sharepoint.com/2013/01/sharepoint-2013-service-accounts-best-practices-explained.html or google for more information. Before you can use AutoSPinstaller you nee to prepare it with the base installation of SharePoint 2013 and prerequisites. For offline installation you might also want to complement it with installation files from the Windows installation media. Follow the steps below to do this:

  1. Create a working directory for AutoSPInstaller and AutoSPSourceBuilder for example: C:\AutoSP.
  2. Download AutoSPInstaller from http://autospinstaller.codeplex.com/ and extract the zip file into C:\AutoSP\
  3. Download AutoSPSourceBuilder from https://autospsourcebuilder.codeplex.com/ and extract the zip file into C:\AutoSP\
  4. Since we use Service Pack 1 of SharePoint 2013 we do not want any of the older cumulative updates that exists in AutoSPSourceBuilder (version Apr 28, 2014) comment out the following lines in AutoSPSourceBuilder.xml:
    AutoSPSourceBuilder.xml
  5. Open up PowerShell as administrator. If you have not run any PowerShell scripts before you might need to change your execution policy to allow scripts by typing the following command:
    Set-ExecutionPolicy unrestricted

    Note: For a production environment or if you have any security concerns you might want to change your execution policy back to restricted or other policy. Read more at:http://msdn.microsoft.com/en-us/library/microsoft.powershell.executionpolicy(v=vs.85).aspx

  6. Mount your SharePoint media. (G: in this case)
  7. Cd to the AutoSPSourceBuilder directory and run the script:
    cd C:\AutoSP\AutoSPSourceBuilder
    .\AutoSPSourceBuilder.ps1 -SourceLocation "G:" -Destination "C:\AutoSP\AutoSPInstaller\SP\2013\SharePoint" -GetPrerequisites $true

    Note: Since we commented out the cumulative update section before we will get an error message – ignore this, the script will continue.

  8. Mount your Windows 2012 R2 media. (G: in this case)
  9. Copy the contents from G:\sources\sxs to C:\AutoSP\AutoSPInstaller\SP\2013\SharePoint\PrerequisiteInstallerFiles\sxs
    This will make any additional features that might be needed for offline installation available to the prerequisite installer.

Configure AutoSPInstaller for installation

AutoSPInstaller uses an XML file to install and configure your SharePoint installation. If you have followed the tutorial you will have the file at C:\AutoSP\SP\AutoSPInstaller\AutoSPInstallerInput.xml.

The default AutoSPInstaller.xml is quite well structured with comments. Use a XML texteditor of your choice to edit the file. Or download, review and use the AutoSPInstaller.xml used in this tutorial.

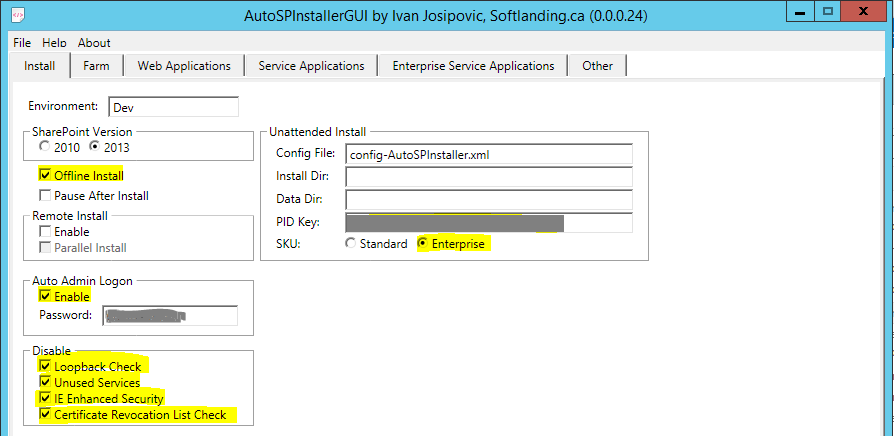
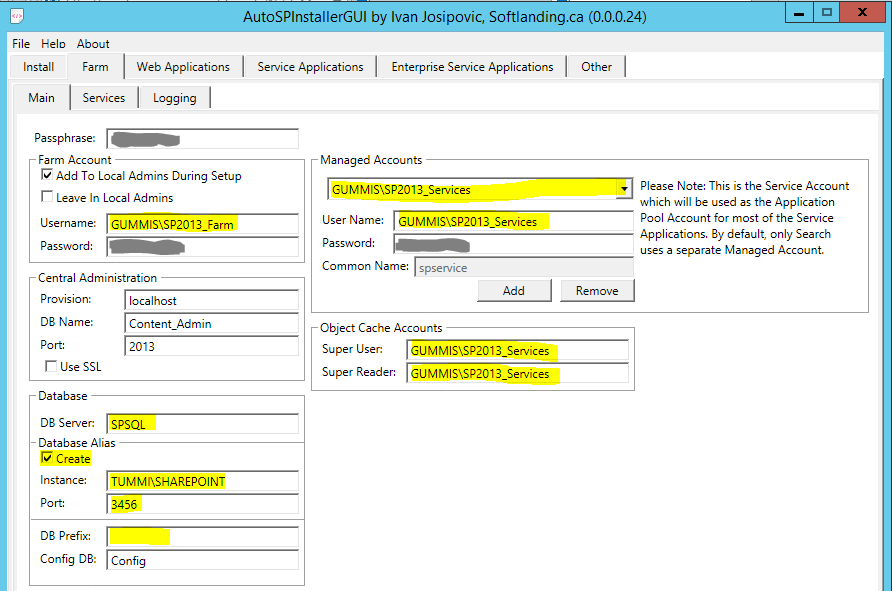
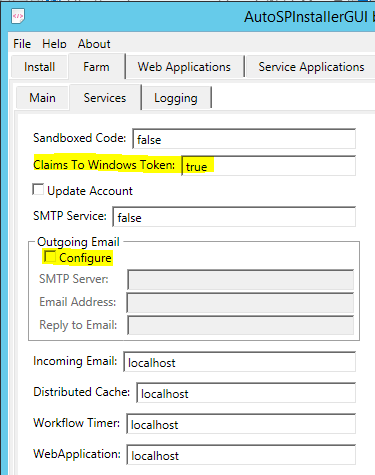
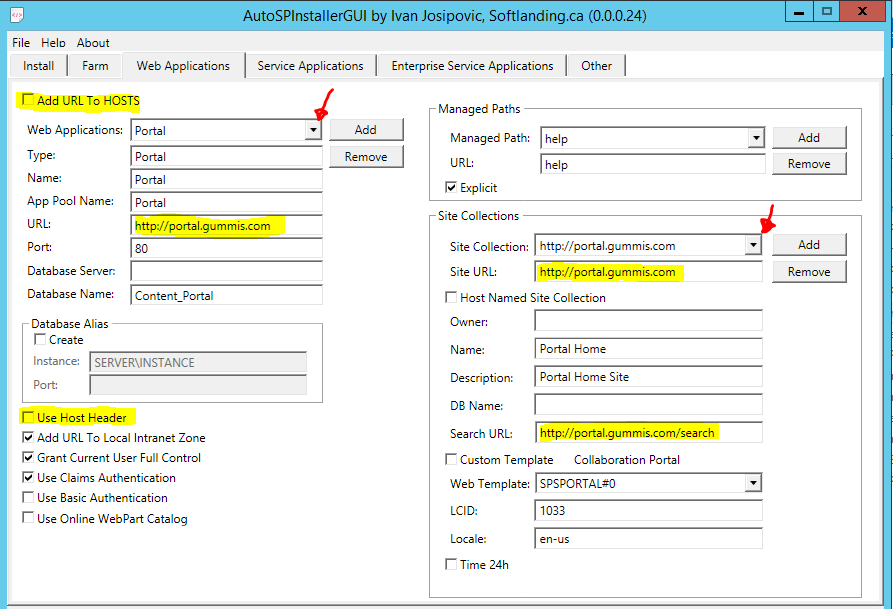
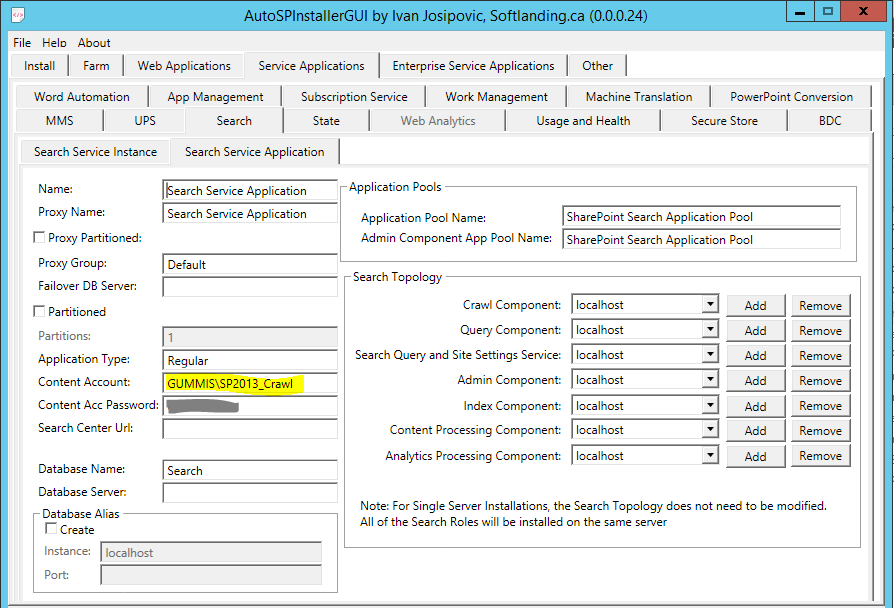
If you like you can also use AutoSPInstallerGUI which is a graphical tool to help you administer the AutoSPInstaller.xml file. Follow the images below for using AutoSPInstallerGUI.

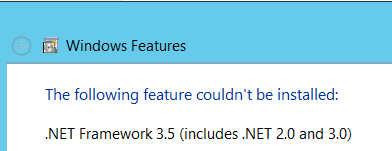
Note: If you get tthe following issue with AutoSPInstallerGUI:

net 35 error


Then run the following command (where source is the sxs directory from Windows 2012 R2 installation media as you prepared earlier):

dism /online /enable-feature /featurename:NetFX3 /all /Source:C:\AutoSP\SP\2013\SharePoint\PrerequisiteInstallerFiles\sxs /LimitAccess

Install tab

AutoSPInstallerGUI Install Tab

 Farm tab

AutoSPInstallerGUI Farm Tab

AutoSPInstallerGUI Farm-Services Tab

Web applications tab

AutoSPInstallerGUI WebApplications Tab

Service Applications tab

AutoSPInstallerGUI ServiceApplications-Search-SearchServiceApplication Tab

The settings not shown above are left as is by default. If you go with AutoSPInstallerGUI do NOT forget to check all the dropdown menus of service accounts, web applications etc. I would recommend that you open the AutoSPInstaller.xml in an texteditor and search for contoso/gummis to ensure that you have configured all url’s and service accounts.

Install SharePoint 2013 SP1 using AutoSPInstaller

In the virtual machine menubar: File –> Take Snapshot. (If anything goes wrong with the installation it will be easy to revert it to its previous state)

Run C:\AutoSP\SP\AutoSPInstaller\AutoSPInstaller.bat as administrator to start the installation.

The installer will make a few tests with user account verification etc. The installation might restart the computer when installing new features/configurations. This is normal. If there is any error you can go back to your AutoSPInstaller.xml and fix it and then re-run the installation script. It will check which steps that are completed and then continue where it stopped last time.

Tip! If the installation stops at some step and take unusual long time click in the powershell window and press enter. (It seems to wait for a keypress at sometimes).

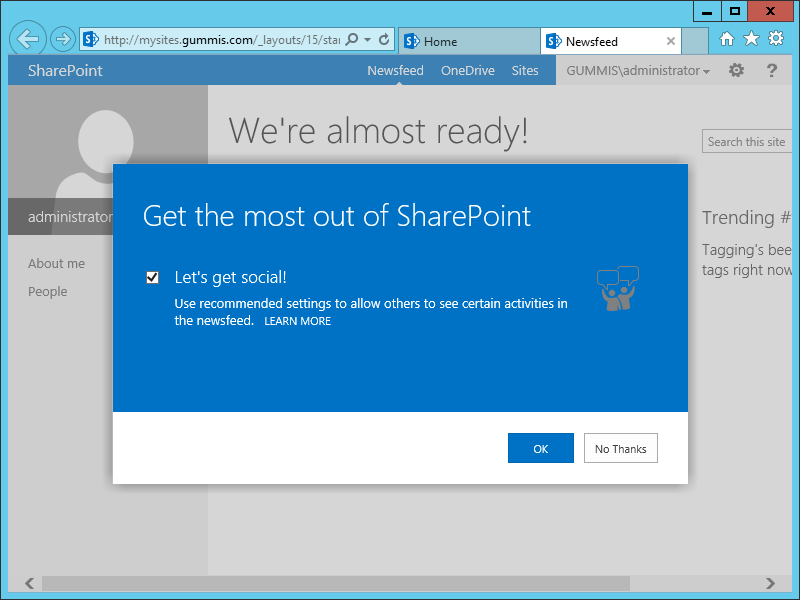
When the script is ready you will hopefully see the mysites and portal site in front of you:

sharepoint almost ready

Configure user profile service application

Open Central Administration –> Application Management –> Manage Service Applications

Open User Profile Service Application –> Configure Synchronization Connections –> Create New Connection:

SharePoint 2013 User Profile Sync Connection

Go back to User Profile Service Application –> Click Start and see that it is working:

SharePoint 2013 User Profile Sync Status

Optimize SharePoint 2013 for development

If you are low on resources on your development machine you might want to adjust some performance settings such as cache size, search service memory usage, database logging etc. to improve performance. Note that this can cause problems and should not be used in a production environment as is. Below are some PowerShell scripts that you can adjust to fit your needs:

# Set search performance level to reduced
Set-SPEnterpriseSearchService -PerformanceLevel Reduced
# Set noderunner memory limit to 50mb
$nrFile = "C:\Program Files\Microsoft Office Servers\15.0\Search\Runtime\1.0\noderunner.exe.config"
$nrConfig = New-Object XML
$nrConfig.Load($nrFile)
$nrConfig.configuration.nodeRunnerSettings.memoryLimitMegabytes = "50"
$nrConfig.Save($nrFile)
# Set distributed cache to 500 (default is 10% of RAM)
$cacheService ="SPDistributedCacheService Name=AppFabricCachingService"
$cacheServiceInstance = Get-SPcacheServiceInstance | ? {($_.service.tostring()) -eq $cacheService -and ($_.server.name) -eq $env:computername}
$cacheServiceInstance.Unprovision()
Use-CacheCluster
Set-CacheHostConfig -Hostname localhost -cacheport 22233 -cachesize 500 | Out-Null
$cacheServiceInstance.Provision()
# Set SP databases in simple recovery mode (less logging and less recovery possibilities)
$srv = "localhost"
[System.Reflection.Assembly]::LoadWithPartialName("Microsoft.SqlServer.SMO") | out-null
$msmServer = New-Object ('Microsoft.SqlServer.Management.Smo.Server') -argumentlist $srv
$msmServer.Databases | where {$_.IsSystemObject -eq $false} | foreach {$_.RecoveryModel = [Microsoft.SqlServer.Management.Smo.RecoveryModel]::Simple; $_.Alter()}
$msmServer.Configuration.MaxServerMemory.ConfigValue = 1500
$msmServer.Configuration.Alter()

Download SharePoint-2013-Dev-Optimization.zip

SharePoint 2013 development environment using Virtualbox

This post will be the first post in a series of posts to setup a SharePoint 2013 Business Intelligence development environment. This first post will cover the base setup with virtual servers and virtual SharePoint 2013 development environment using Virtualbox .

Later there will follow posts cover a complete SharePoint 2013 environment configured with all Business Intelligence services (Excel Services, Reporting Services, Power View and Performance Point Services) and kerberos authentication.

Kerberos authentication is usually needed when you are running SharePoint 2013’s Business Intelligence services in an environment where the data (Data warehouse(s)/Cubes) are stored on a different machine than the SharePoint server where reports and analyses are viewed. 

SharePoint 2013 BI Development Environment Tutorial

  1. >SharePoint 2013 development environment using Virtualbox<
  2. Install SharePoint 2013 SP1 using AutoSPInstaller
  3. Configure SharePoint 2013 Business Intelligence Services
  4. SharePoint 2013 Business Intelligence kerberos configuration

Contents

Please note that this post will only cover the installation and setup of the virtual machines and not the actual SharePoint 2013 installation. The SharePoint 2013 installation will follow later in the post Install SharePoint 2013 SP1 using AutoSPInstaller.

The setup will look as the diagram below:

sharepoint2013_virtual_environment

Note: The resources assigned to the machines in this setup are at the bare minimum and only recommended for testing. For any serious development and heavier use you will most likely need to increase the amount of RAM and vCPU’s. I would recommend about twice the resources for all the machines if possible. If you are not using a fast SSD disk go get one – you will need it! If you wonder where the lame server names are from I have taken them from Disney s’ story of The Gummibears. 

Prerequisites

Below is required software installation medium/ISO files. Please note that you should use the R2 version of Windows 2012 and SP1 of both SharePoint 2013 and SQL Server. If you use lower versions some of the Business Intelligence features that are to be installed at a later stage might not work!

For this post:

  • Microsoft Windows Server 2012 R2
  • Microsoft SQL Server 2012 SP1
    (Standard edition or better)
  • Microsoft SQL Server 2012 CU 8 (Cumulative Update 8)
    Download from: http://support.microsoft.com/kb/2917531

For the upcoming series of SharePoint 2013 Development Environment posts

  • Microsoft SharePoint Enterprise Server 2013 SP1
    (Note that enterprise is required for Business Intelligence features)

Install Oracle Virtualbox

Oracle Virtualbox is a software that allows you virtual machines (multiple virtual operating system installations) on your PC. There are several other alternatives around like Microsoft Hyper-V and VMWare vSphere however I choose to write this post on Oracle Virtualbox since it is cross-platform and open source. To get started grab the installer package for your system from:
https://www.virtualbox.org/wiki/Downloads
(
This post is written and tested using Virtualbox 4.3.10 r93012 with Windows 8.1 as host system)

  1. Install Virtualbox from downloaded installation file
  2. Start virtualbox
  3. Click File –> Prefrences –> Verify or change the default machine folder.
    This is where Virtualbox will but Virtual Machines and their corresponding virtual harddisk files as default. Preferably use a hard drive with enough disk space – it should be able to host Windows Server 2012 R2, SharePoint 2013 Enterprise Server SP1, SQL Server 2012 SP1 and then additional contents and software that you plan to use. e.g. Visual Studio, sample data etc. For this guide you will probably need at least 50gb of free space. (Since we use an immutable disc image as base we will only need to reserve space for one Windows installation)
    virtualbox_vm_directory 

Prepare Virtualbox immutable base image

A base image in Virtualbox is called immutable image. An immutable image is a virtual hard disk file that cannot be changed. When you create a immutable image in virtualbox that file can be used as base file for several other virtual machines hence saving time and disk space. In this setup we will create an immutable hard disk file with a base installation of Windows Server 2012 R2. We will then use this file as base for the virtual machines that we will create. Then the other virtual machines create will only hold the file differences from the immutable image. This will save both disk space and time when we create new virtual machines.

To create the immutable hard disk file we will first need to create a new virtual machine that creates and uses that file. When we are ready we can remove the virtual machine but save its’ hard disk file (VDI file) and use it as a base image to other virtual machines.

  1. Create new virtual machine for use as base imageClick Machine in the menubar–> New –>
    Name: Windows Server 2012 R2 Immutable.vdi (or whatever you want), Type: Windows, Version: Windows 2012 (64-bit) –> Next –>
    Memory size: 2048 –> Next –>
    Create virtual harddrive now –> Select VDI –> Next –>
    Select Dynamically allocated –> Choose location,  Drive size: 500GB (Since it is dynamic it will not reserve this amount of space on your drive so there is no reason to be sparse on disk size) –> Click Create
  2. Mount Windows 2012 R2 ISO fileSelect your newly created machine in the list and click settings –>
    Storage –>  Select empty CD/DVD icon –> Click the small CD icon to the upper right:
    virtualbox_choose_cd_dvd_iso
    Browse to and select your Windows 2012 R2 ISO file. Click OK.
  3. Click Start to run your virtual Machine (VM)
  4. Install Windows
  5. Install Virtualbox Guest Additions CD Image.Click Devices –> Insert Guest Additions CD Image
    Open windows explorer –> CD/DVD device –> Run through the installation
    (The installation will provide windows with devices drivers for Virtualbox)
  6. Install Windows Updates and other software that you would like to have in all of your virtual machines
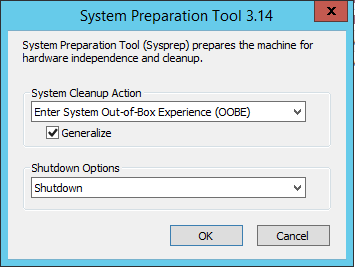
    Run C:\Windows\System32\Sysprep\sysprep.exe –> Click generalize –> Shutdown:
    sysprep
  7. When sysprep is complete next time when the virtual machine is started it will start with a clean windows installation. E.g. you have to fill in administrator password and initial setup will start. (Just as when you buy a new computer and start it for the first time)

Make virtual disk immutable

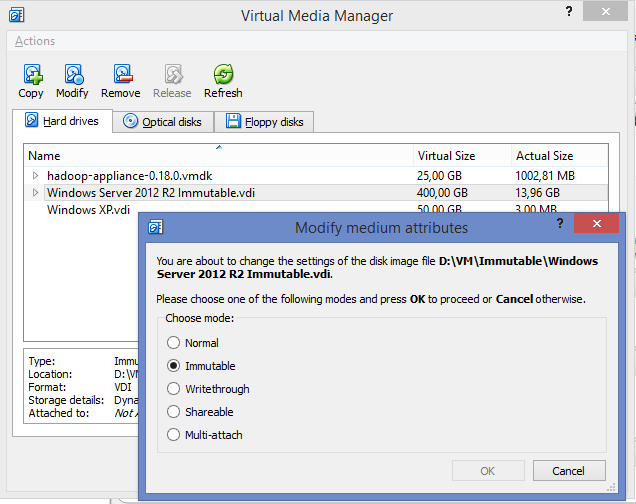
  1. In Virtualbox main window: Click File –> Virtual media Manager –> Select disk –> modify –> Check immutable:virtualbox_make_disk_immutable
  2. Select your created VM and right click –> Remove . Then make sure to click Remove ONLY. This will remove your VM but not its’ virtual hard drive file which will make an immutable VDI file for use as our base image.
  3. We now have a immutable disk file for use as base imge when we create the rest of our virtual machines.

Configure Virtualbox virtual network

This section will create a virtual network where our virtual machines can communicate with each other. The network will have access to your computer network through NAT (Network Address Translation) which also will provide internet access for your virtual machines.

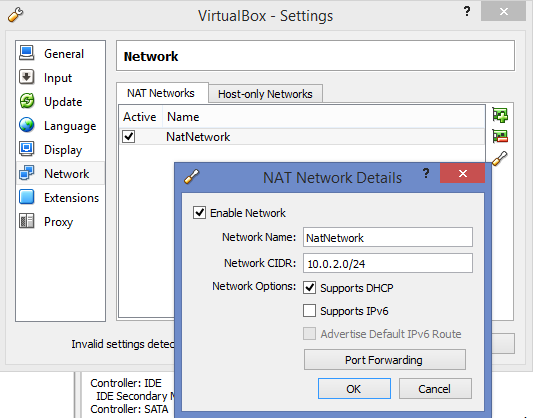
  1. In Virtualbox main window: Click File –> Preferences –> Network tab –> Click the small “cirtucuitboard icon” to the upper right to add a new NAT Network –> Enter details as below:
    rtualbox_virtual_network


Setup AD/DNS virtual machine

  1. Create new virtual machine
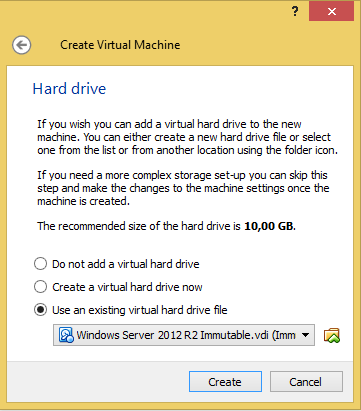
    Instead of creating a new disk file during the wizard select use existing disk file and choose the file that we made an immutable disk image in previous step:
    use_existing_vdi_file
  2. In Virtualbox main window: Select the newly created machine –> Settings:
    – General tab –> Advanced tab: Configure Shared Clipboard and Drag’n Drop if you prefer to be able to use it
    – System tab: Adjust RAM and CPU to fit your needs. (I run with 1vCPU, 1GB RAM)
    – Network tab: Select the nat network that we created earlier:
    virtualbox_configure_vm_natnet
    – Click OK.
  3. Start the VM
  4. In menubar: Select Machine –> Take Snapshot –> OK
    (Important! The snapshot will create a new VDI file that holds the VMs file difference towards the base image file so without it all changes will be lost upon reboot)
  5. Enter user information and password
  6. Change computer name (Zummi)
  7. In Control Panel –> Network and Sharing Center –> Change adapter settings –>
    Right click ethernet adapter –> Properties –> Select Internet Protocol Version 4 TCP/IPv4:
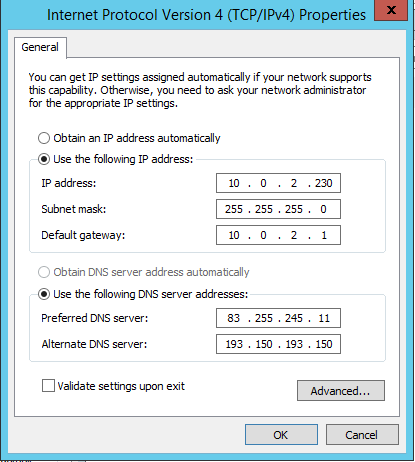
    Change network to static and use the ip-addresses that matches our virtual network created earlier:
    windows_network
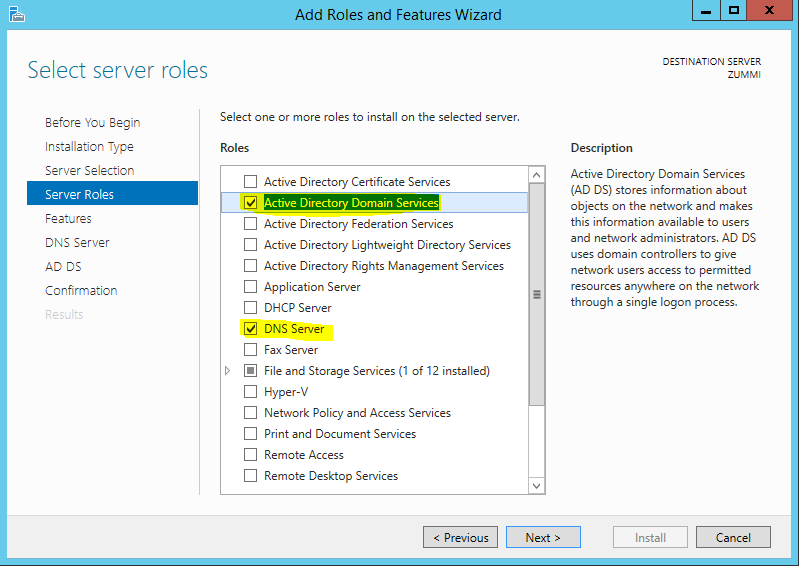
  8. In Server Manager: click Add Roles and features and add Active Directory (AD) and DNS roles to server:
    add_role_ad_dns
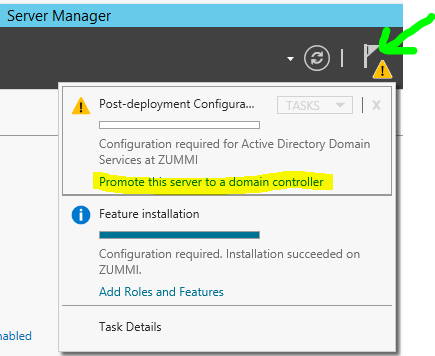
  9. In Server Manager: Click the “flag” and Promote this server to a domain controller:
    promote_domain_controller
    – Add new forest
    – R
    oot domain name: gummis.com
    – 
    Type in domain password
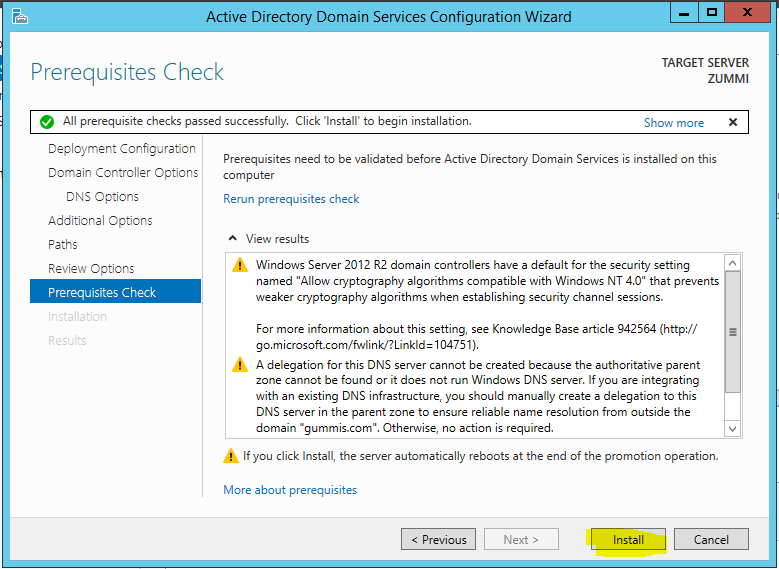
    – Click next addiotnal steps to the prerequisites check:
    domain_check
    – Install
  10. In Active Directory Computers And Users create SQL service account user:
    SQL2012_Services Used for SQL server services (sql server, ssas, tabular, power opivot, agent etc.)
  11. Done

Setup database virtual machine

  1. Create new virtual machine (using the immutable disk file as before)
  2. Take Snapshot
  3. Enter user information and password
  4. Change TCP/IP network settings:
    IP: 10.0.2.231
    Netmask: 255.255.255.0
    Gateway: 10.0.2.1
    DNS: 10.0.2.230
  5. Change computer name (Tummi)
  6. Join gummis.com domain

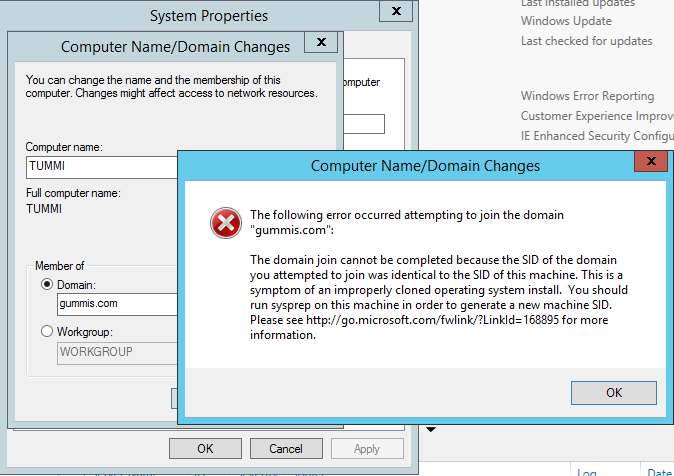
    Note, if you get the following problem:
    join_domain_error
    – Run C:\Windows\System32\Sysprep\sysprep.exe
    – Select enter system audit mode
    – Reboot

  7. In menubar: Select devicse –> CD/DVD –> Chose from virtual CD/disk file –> Select your Microsoft SQL Server 2012 SP1 ISO file
  8. Install default SQL and Analysis Services instance (MSSQLSERVER). This instance will be used for Business Intelligence content in this scenario and not for SharePoint databases. Open the installation from the CD/DVD drive in windows explorer. Run setup.exe and go through the installation wizard with the following configuration shown in the images below. For more details around SQL Server installation please see:
    http://msdn.microsoft.com/en-us/library/ms143219.aspx

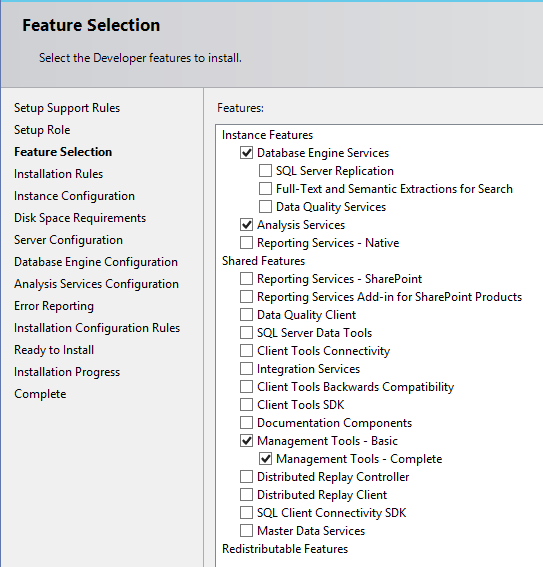
    Select features:
    sql_1_feature_selection

  9. Configure service accounts.
    Use SQL2012_Services account for SQL services:
    sql_3_user_accountsDo not forget to add yourself/domain admin account as administrator account:
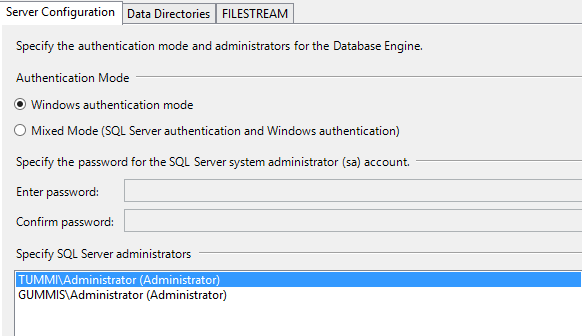
    sql_3_user_admins
  10. In the SSAS configuration chose to install Analysis Services in multidimensional mode
  11. Finish the next steps of the SQL installation wizard.
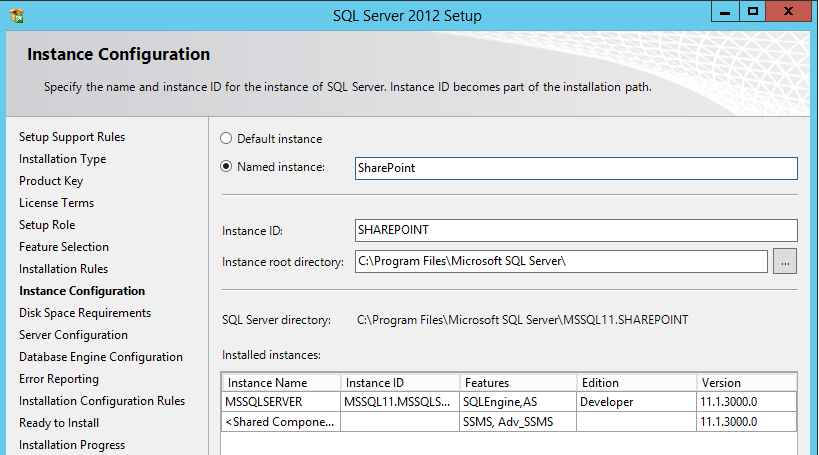
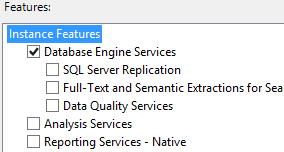
  12. Install another SQL Service instance named SHAREPOINT for use with SharePoint content, administration and service application databases. Feature selection:
    sql_4_sharepoint_instanceChange name of instance:
    sql_4_sharepoint_instance_change_nameConfigure service accounts:
    sql_4_sharepoint_service_accountsDo not forget to add yourself/domain admin account as administrator account:
    sql_3_user_admins
    Finish the rest of the steps in the SQL Server Feature installation wizard.
  13. Install SQL Server CU 8
    – Download from http://support.microsoft.com/kb/2917531
    – Run SQLServer2012-KB2917531-x64.exe to apply the update. Apply the update for all SQL/SSAS instances.
  14. Open and enable service ports. 

    Note: If you disable the firewall you will not need to add firewall rules and configure dynamic ports and can skip those settings.

    Open windows firewall advanced settings and add the following inbound rules:
    windows firewall sql services

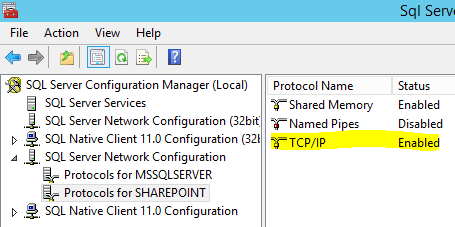
  15. Open SQL Server Configuration Manager and enable TCP/IP for all instances:

    sql server configuration manager enable tcpip

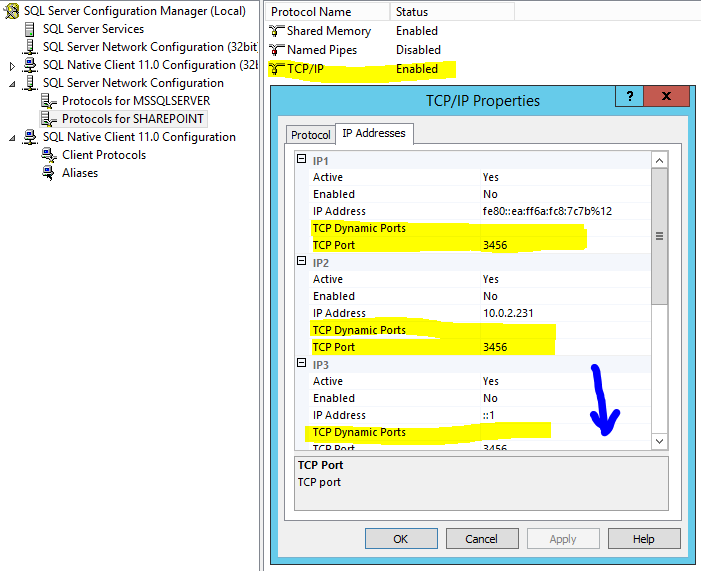
    Named instances have dynamic ports by default which we need to change to static ports if the firewall rules above should work. For more information on how to change a SQL Server instance to use static ports please see: http://technet.microsoft.com/en-us/library/ms177440.aspx.

    Configure static ports for our SharePoint named instance as below. Do not forget to scroll down and change all of the bindings to be static.

    sql server named instance static port

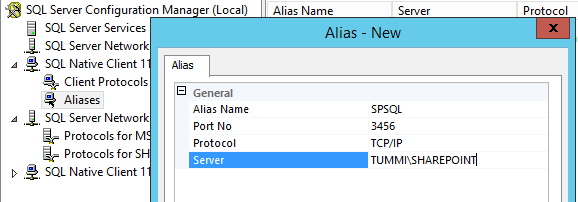
  16. Create SQL Alias in SQL Configuration Manager (good practive if you would move/migrate server in the future)
    sql create alias
  17. Done

Setup SharePoint 2013 machine

  1. Create new virtual machine (using the immutable disk file as before)
  2. Do not forget to add more resources to this mahine. In virtualbox main window: select VM –> Settings:
    – System Tab:
    – Increase CPU (I choose 2 vCPU)
    – Increase RAM (I choose 8 GB)
    (As mentioned before these are absolute minimum settings and only recommended for testing – at least double it for heavier use)
  3. Take Snapshot
  4. Enter user information and password
  5. Change TCP/IP network settings:
    IP: 10.0.2.232
    Netmask: 255.255.255.0
    Gateway: 10.0.2.1
    DNS: 10.0.2.230
  6. Change computer name (GRAMMI)
  7. Join gummis.com domainNote, if you get the issue with duplicate SID run sysprep as mentioned in step 6 of Setup database virtual machine
  8. If you are going to access your SharePoint server from the network as well do not forget to login to add firewall inbound rules for TCP/IP ports 80 and 443.
  9. Done (Actual SharePoint 2013 SP1 installation will be done using AutoSPinstaller in upcoming posts)


SSRS scale-out deployment configuration error

Introduction

This article describes SSRS scale-out deployment configuration error that can occur during migration of the ReportServer database from SSRS 2008 Enterprise/Developmnet to SSRS 2012 Standard (Native mode). When importing encryption keys from the source server a scale out deployment server is added to the configuration on the new target server that cannot be removed through the user interface. The scale-out deployment configuration is also not supported by the SSRS 2012 Standard edition. I have not verified the reason for this behaviour in detail but the affected system(s) in the article is:
Microsoft SQL Server 2008 SP1 10.0.2841.0 (x64) Developer Edition (source system)
Microsoft SQL Server 2012 SP1 11.0.3401.0 (x64) Standard Edition (target system)
Microsoft Windows Server 2012 R2 Version 6.3 (Build 9600) (target system)

Problem

You have your old server  (SQL 2008 SP1) with lot of reports that you would like to migrate to a new server with a newer version of Reporting Services (SQL 2012). To accomplish this you can migrate the ReportServer database from the old server to the new.

Migration steps:

  1. Backup ReportServer database on source machine
  2. Backup encryption keys on the source machine
  3. Restore of ReportServer on the target machine
  4. Change/connect the database to ReportingServices on the target machine using Microsoft Reporting Services Configuration Manager
  5. Restore encryption keys on the target machine

For more detailed explanations please see:
Migrate a Reporting Services Installation (Native Mode)
http://msdn.microsoft.com/en-us/library/ms143724.aspx

Moving the Report Server Databases to Another Computer
http://msdn.microsoft.com/en-us/library/ms156421.aspx

Scale-out deployment configuration error
However when doing step 5 the old server will be added for scale-out deployment on the target machine. If the source and target machine are using different licenses of Reporting Services you might encounter issues that some features are not supported when migrating to a less featured sql server license.

One such issue can be when you try to browse to the report manager url and get the following error:
ssrs scale out deployment error
The feature: “Scale-out deployment” is not supported in this edition of Reporting Services. (rsOperationNotSupported)

Normally that should not impose a problem since you would be able to remove the old server from scale-out deploment from the list in Microsoft Reporting Services Configuration Manager:
SSRS Delete Scale Out Deployment Server Error

At least one would think so… however as seen in the image above this might not work as expected. If you click the link “Tell me more about the problem and how to resolve it” you will get the following:

Microsoft.ReportingServices.WmiProvider.WMIProviderException: No report servers were found. ---> System.Management.ManagementException: Invalid namespace
 at System.Management.ManagementException.ThrowWithExtendedInfo(ManagementStatus errorCode)
 at System.Management.ManagementScope.InitializeGuts(Object o)
 at System.Management.ManagementScope.Initialize()
 at System.Management.ManagementScope.Connect()
 at ReportServicesConfigUI.WMIProvider.RSInstances.GetInstances(String machineName)
 --- End of inner exception stack trace ---
 at ReportServicesConfigUI.WMIProvider.RSInstances.GetInstances(String machineName)
 at ReportServicesConfigUI.WMIProvider.RSInstances.GetInstance(String machineName, String instanceName)
 at ReportServicesConfigUI.Panels.ClusterManagementPanel.ConfigureWebFarm(Object sender, RSReportServerInfo[] rsInfos)

Solution

Fortunately there is an easy solution for this problem. Open up table dbo.Keys in the ReportServer database on the target server and look at its contents:
ReprtServer dbo.keys table

Delete the old server from the list and the scale-out deployment error should be gone when you open up report manager url. (At least if you do not have any additional enterprise/developer features referenced from the reportserver database)

DELETE FROM [ReportServer].[dbo].[Keys]
WHERE MachineName = 'YourSourceServerName'