This guide will show you how to setup and configure SharePoint 2013 BI (Business Intelligence) services. The guide will cover the following BI services and features:
- Excel Services
- Reporting Services
- Performance Point Services
- PowerView
We will be using PowerShell for most of the setup and configuration tasks. This will not only speed up the process but will also ensure that it is done in the same way the next time you do it. We will also use PowerShell to provision application pools and user accounts to have one service account for each BI service application. This post is the third post in the series of posts with the theme SharePoint 2013 BI Development Environment:
SharePoint 2013 BI Development Environment tutorial
- SharePoint 2013 development environment using Virtualbox
- Install SharePoint 2013 SP1 using AutoSPInstaller
- >Configure SharePoint 2013 Business Intelligence Services<
- SharePoint 2013 Business Intelligence kerberos configuration
Even though this post assumes you have done the previous guides above you can still adapt it to your own environment. Just ensure to change computer/accounts names etc.
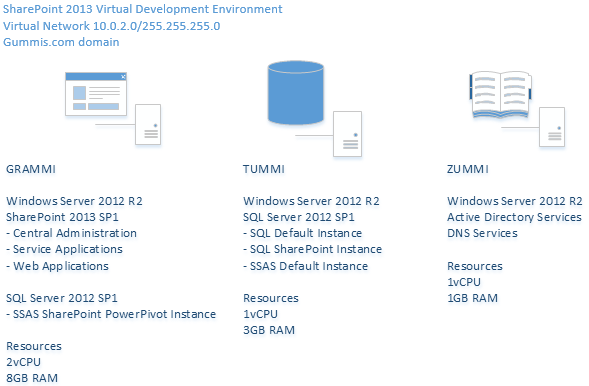
If you have followed the previous articles you are now familiar with the picture below, presenting a diagram of the servers in our setup:
If you are a bit familiar with SharePoint setup and BI configuration you have already noticed that in order for our BI services to work properly with user delegation (be able use “current user” login on our BI data sources, cubes, reports etc.) we will need to configure kerberos. This is due to limitations with NTLM and s double hop scenario. This will be described in the 4th post: SharePoint 2013 Business Intelligence kerberos configuration (upcoming).
However we will still be able to use our BI data source if we configure unattended service access accounts for our BI services which is described in additional configuration section of this post.
Contents
Prerequisites
Before continuing ensure you have already have the following setup (please note that certain combinations of the software below with lower versions e.g .not SP1 of SQL/SharePoint which might not work properly together):
- Microsoft SQL Server 2012 SP1 Installation medium
- Office 2013 Professional Installation medium (For testing purposes)
- SharePoint Server/Virtual machine with:
- Windows Server 2012 R2
- SharePoint 2013 SP1
- SQL Server/virtual machine with:
- Windows Server 2012 R2
- SQL Server 2012 SP1 CU8 (Cumulative Update 8)
- SQL Services instances for intended BI services you would like to use:
- Analysis Services (Multidimensional/Tabular)
- PowerPivot for SharePoint instance
Prepare sercice accounts
Make sure you have setup the following services accounts from the previous post, Install SharePoint 2013 SP1 using AutoSPInstaller then configure their security rights as specified in table below. Access rights on service application databases etc will be taken care of when they are provisioned using PowerShell script later.
| Account | Security settings |
| SP2013_ExcelServices |
Excel Services Security rights: On SQL Server, locate Central Administration database (Usually SharePoint_AdminContent). Expand security folder –> add/open setttings for SP2013_ExcelService account –> in the mappings settings tick the SPDataAccess role checkbox –> OK. |
| SP2013_PowerPivot |
PowerPivot Services Security rights: |
| SP2013_PPS |
Performance Point Services Security rights: |
| SP2013_RS |
Reporting Services (Note, if you plan to configure kerberos later read this: when using reporting services in integrated mode with reporting services service application on the same server as your site web application the web application and reporting services service application need to use the same service account!) In this setup the SP2013_WepApp will be used as service account for reporting services and no dedicated reporting services account will be used. Security rights: (Needed if you would like to use PowerPivot as source for PowerView reports) Admin rights on Analys Services (SSAS) tabular instances that you which to use as source for PowerView. |
| SP2013_WebApp |
Site web application pools Security rights: |
| SP2013_Install |
Installation account This account will be used for installation and configuration of the BI services with the exception of PowerPivot Configuration Tool which have some issues to detect proper user permissions. (described later) Security rights: |
| SP2013_DataAccess |
Unattended Data Access account Security rights: Note: If you are going for kerberos configuration later you might not need this account. |
To add account as administrator on an analysis services instance, connect to the instance in management studio -> right click instance name -> properties -> security tab -> add accounts.
Note: If you have problem to open the properties window of analysis services this might be that you have not applied latest cumulative update (CU) of SQL Server. (This tutorial uses CU8)
Install required software
SharePoint 2013 relies on several add-ins that are a part of Microsoft SQL Server. Download and install the add-ins/software that is required for the services that you wish to use. All software in this post should be installed on your SharePoint 2013 application server running the service(s) you wish to install.
Reporting Services add-in
Install Reporting Services for SharePoint and the Reporting Services add-in from the SQL Server 2012 SP Installation media on your SharePoint Application Server (GRAMMI).
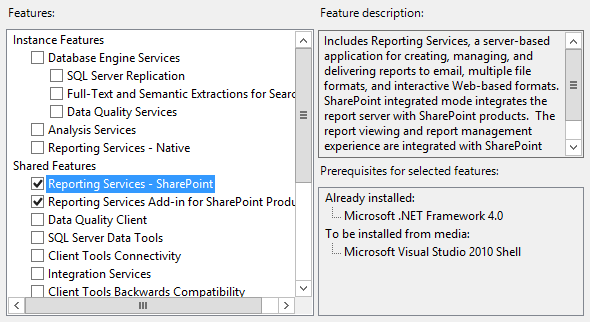
Note: The Reporting Services – SharePoint feature add shared features for reporting services. Even though you are able to install only the Reporting Services Add-in without Reporting Services – SharePoint feature this will not work since you will have issues later when creating service applications etc.
This tutorial is tested with SQL Server CU8 where the reporting services add-in is bundled. Go to the link below, request the ssrs add-in (2012_SP1_RSShrPnt_CU8_2917531_11_0_3401_x64). (You will get a download link by e-mail))
http://support.microsoft.com/kb/2917531
Install and upgrade the Reporting Services add-in to CU8.
- Install SQL Server PowerPivot for SharePoint instance
For more detailed information see:
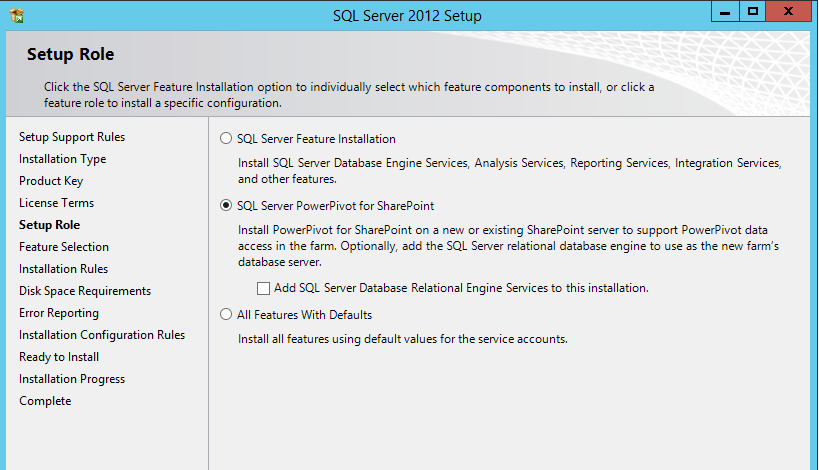
http://msdn.microsoft.com/en-us/library/jj219067.aspxRun setup from your SQL Server 20012 SP1 installation medium.
Select SQL Server PowerPivot for SharePoint:
- Add Management Tools Complete feature during features selection
- Configure service accounts:

- Do not forget to add yourself/domain admin account as administrator account.
- Finish the rest of the steps in the SQL Server Feature installation wizard.
- Install and apply SQL Server CU8
- Download and install PowerPivot for SharePoint 2013 Add-In from:
http://www.microsoft.com/en-us/download/details.aspx?id=35577
Performance Point SQL 2008R2 ADOMD.Net provider
Allthough SQL 2012 ADOMD.Net provider is installed when installing other SQL Server features (such as PowerPivot above) Performance Point in SharePoint 2013 still needs ADOMD.Net for SQL Server 2008 R2. Download and install it from:
http://www.microsoft.com/en-us/download/details.aspx?id=16978
Click download and scroll down to:
Microsoft® SQL Server® 2008 R2 ADOMD.NET
Install both the 32 & 64 bit version.
For detailed information on PowerPivot configuration please see:
http://msdn.microsoft.com/en-us/library/jj682085(v=sql.110).aspx
We will configure PowerPIvot in three steps involving:
- Initial configuration (done in this step)
- Provision Powerpivot Service Application (done in next step)
- Configure unattended data refresh account and active site features
The PowerPivot Configuration tool will be used in step 1 and 2 above. Find PowerPivot Configuration tool in the start menu/start screen (make sure you start the one for SharePoint 2013 and not 2010).
Note: You might get the error message:
“The user is not a farm administrator. please address the validation failures and try again.”
This is a bit misleading since even if your installation account is farm administrator and local administrator the configuration tool does not seem to pick it up. To solve this issue add your farm account to local administrators group. Logout and login again. Right click PowerPivot Configuration tool and run as administrator. (Remove farm account from local administrators group when done with the rest of the steps in this post)
Go through the configuration settings.
Configure default account. (GUMMIS\SP2013_Farm) and type in password.
Make sure to not create the service application in this step:
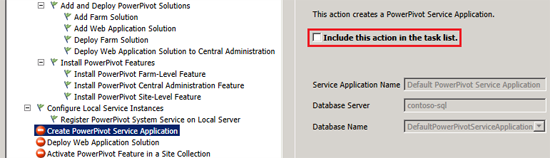
Click verify and then run to complete this task.
Provision BI Service applications using powershell
You may configure all service applications in this tutorial through the user interface in Central Adminstration (or have them configured automatically when installing SharePoint using the default installer. However for more complex setups I like to use PowerShell and also configure each service application with its own application pool and service account. This makes it easier for troubleshooting, improved security and more flexibility to scale up you farm.
I have put together a PowerShell Script to configure and provision SharePoint 2013 BI service applications. Download it here:
Configure SharePoint 2013 BI Services.ps1 (zipped PowerShell script)
In the beginning of the script there are parameters to configure which service applications you which to provision. There is also a parameter to configure Claims To Windows Token account – we will do this later in upcoming post: SharePoint 2013 Business Intelligence kerberos configuration (upcoming)
For this tutorial configure the script to provision:
- Reporting Services
- Excel Services
- PowerPivot Services
- PerformancePoint Services
Run the script from PowerShell with the SharePoint installation account or other account with enough permissions. (farm administrator)
Note: You might get some error messages/warnings indicating that some services already are started or enabled depending on the state of your environment.
If everything goes ok you will now have one application pool with one service account for each service. You can look up SharePoint applicaiton pools with the following powershell script:
Get-SPServiceApplicationPool | Select Id, Name, ProcessAccountName
Also verify that all the service applications and proxies have been created in the “Manage Service Applications” page in Central Administration.
If anything goes wrong with the script try to figure out the error messages, remove created databases, service applications and application pools and try to correct the problem and run again. (Use the Get-SPServiceApplicationPool to find out the ID name of your application pool and then remove them from IIS Manager (inetmgr))
Additional configuration steps to complete setup
The following steps creates unattended service accounts for each BI service and other settings. When done you will have 3 unattneded accounts in Central Administration -> Manage Service applications -> Secure Store:
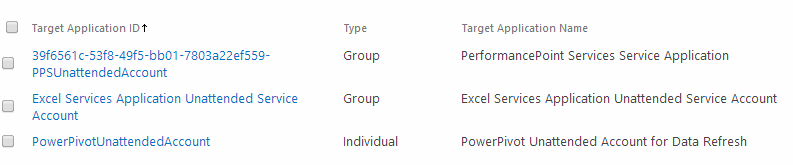
If you do not want to have one account for each service you may also configure one custom secure store account and then use only one account for all desired services.
Reporting Services
- Add service account for reporting services as sysadmin to PowerPivot instance (GRAMMI\LOCALHOST)
(Open in SQL Management Studio, right click instance, security tab, add user (SP2013_WebApp) - In central administration -> Application Management -> Manage Service applications -> Reporting Services Service application, configure the following:
- Provision Subscriptions and Alerts
- Download Script
- Logon to SQL Server and run the downloaded script
- Back in central administration: Enter Username and password with account (SP2013_Install) that has sufficient permissions on the SQL server and press OK.
- Verify that Reporting Services and PowerView features are enabled in site collections and sites where you wish to use them.
Excel Services
- Add service account for excel services as sysadmin to PowerPivot instance (GRAMMI\LOCALHOST)
- In central administration -> Application Management -> Manage Service applications -> Excel Services Service application, configure/verify the following:
- Unattended refresh account:

- Data Model Server
Set to LOCALHOST\POWERPIVOT - Trusted Data Sources
- Trusted File Locations
- Unattended refresh account:
- Verify that SharePoint Enterprise Site Collection and Site Features is enabled in site collections and sites where you wish to use Excel Services.
PowerPivot Services
- Add service account for PowerPivot service application as sysadmin on PowerPivot instance (GRAMMI\LOCALHOST)
- Login as farm administrator account. (make sure account also is local admin)
- Start PowerPivot for SharePoint 2013 Configuration tool.
- Enter password for default account (SP2013_Farm)
- Select your target web application:

- Configure account for unattended data refresh (SP2013_DataAccess):

- Click verify (Run will not be enbled) -> If everything goes well you will see that PowerPivot Features and have been enabled and that you unattended account is created in secure store service application.
- Ensure PowerPivot Feature Integration for Site Collections feature is enabled in the site collections where you wish to use it.
Performance Point Services
- Configure secure store account (SP2013_DataAccess)
- Configure PerformancePoint services trusted file location and authentication settings
- Ensure PerformancePoint Site Collection and site features are enabled in the site collections and sites where you wish to use it.
Test and verify
Note: This test will be without kerberos which will be discussed in another upcoming post. Since kerberos is not enabled yet we need to use a combination of service accounts (SQL/Windows/Secure Store) to make all services work. This will only be covered briefly since there are several different authentication types, data source providers and data sources available for use. Do tests that suits for your own needs.
Add portal to trusted sites in Internet Explorer
Configure service and access accounts on your SQL/SSAS instances
- Ensure your unattened access account has read access to all data sources you intend to use (SP2013_DataAccess)
- Ensure your SSAS Service account (SQL2012_Services) have administrator rights on your SQL Server data instance (TUMMI default isntance)
Install software
Install Office 2013 on SharePoint machine (GRAMMI) or any other machine that you would like to use as client for testing)
Install SQL Server Data Tools (former BIDS) on SQL machine (TUMMI or any other machine that you wish to use for SQL/SSRS/SSAS development)
Install sample data
Microsoft provides its classic AdventureWorks database with models for multidimensional and tabular cubes which you can use for testing purposes in your environment if you do not have any other data available. I will only provide basic steps here so please read instructions for howto deploy AdventureWorksDW and projects properly.
http://msftdbprodsamples.codeplex.com/releases/view/55330
- Download: AdventureWorksDW2012_Data.mdf
- Attach mdf file to default SQL instance on TUMMI (or if you have other instances/names) with the following script:
CREATE DATABASE AdventureWorksDW2012
ON (FILENAME = '<PATH__TO>\AdventureWorksDW2012_Data.mdf')
FOR ATTACH_REBUILD_LOG;
Note: You might need to enable named pipes in SQL Configuration Manager for the script to work.
- Download AdventureWorks Multidimensional Models SQL Server 2012.zip
- You will need to re-configure the data source and enter deployment properties for the projects in Visual Studio before you deploy them.
- Deploy the multimdensional project to the default SSAS instance (TUMMI)
Configure test site
- Create a new subsite, use the PowerPivot Site Template
- Enable Enterprise, Performance Point, BI Data Connection Library and other features you wish to use.
- Add the following apps:
- Data Connection Library
- PerformancePoint Content Library
- PerformancePoint Data Connection Library
- Add Reporting Services Content Type to the existing PowerPivot Library (Included in PowerPivot site template)
(PowerPivot Library -> Library tab -> Library Settings -> Advanced settings -> Allow management of content type -> back to Library settings -> Add Content Type -> Add Report Builder Report. - Add BI Semantic Data model, Reporting Data Source and Report Data Model Content Types to Data Connections Library
Test Excel Services
Add an excel document to PowerPivot gallery and verify that you can open the document in the web-browser.
Test PowerPivot Services
- Create an excel document with a PowerPivot model that has your SQL server (TUMMI default instance) as data source.
- In Excel: Data tab -> Connections -> Select connection to SQL server (TUMMI) -> Properties -> Definition -> Authentication Settings -> None.
- This will make the workbook data refresh use the unattended account that you configured earlier.
- Add the document to the PowerPivot gallery.
- Verify that you can open and refresh the data source.
Test Reporting Services and PowerView
- In PowerPivot Gallery hover over the document you created before, in the upper right corner click the create powerview report.
Note: If report cannot load make sure that you have configured the service account for reporting services service application as system administrator on the PowerPivot instance.
Test reporting services and report builder
- In PowerPivot Gallery -> File tab -> New -> Report Builder Report (If the report builder tool does not download make sure you have installed CU8) -> Run and install report builder report -> create a test report against SQL/SSAS data source on SQL server (TUMMI), make sure to use a system account (SP2013_DataAccess) to access the data source. Enter the user information under the credential tab.
Note: You might need to add your current user to have read access to the datasource when building the report.
- You will need to use a system account if your current user not is added to the data source you wish to use. Save and test the report in PowertPivot Gallery.
Test Performance Point Services
- Open the Performance Point Content List
- In Performance Point tab -> Open dashboard designer
- Create a new datasource, use unattended service account as credentials.
- Add a new report
- Save and publish to site and verify that they work.
Note: You might need to add your site to Internet Explorer Trusted sites for Performance Point Dashboard Designer to work properly.
Thank you for this very comprehensive write-up Jonas! I don’t know if you’ll receive this as I recognize the posting is over 2 years old. Regarding your statement, “(Note, if you plan to configure kerberos later read this: when using reporting services in integrated mode with reporting services service application on the same server as your site web application the web application and reporting services service application need to use the same service account!)”, can you offer any further information as to why this is true? I am running the RS service application integrated within SP2013 on the same server as the web application, am planning on configuring Kerberos, and was hoping to use a dedicated service account for RS!